

The Best Google Analytics Spam Filter
Update: This article is not current with the new version of Google Analytics (GA4). There are few things more frustrating than looking in your Google Analytics data and seeing a huge spike in traffic that comes from trafficclub.xyz or bottraffic.com. You’ve been spammed!
You can apply a filter to block out that particular traffic source from showing up again in the future but it always feels like a matter of time before the bots come again. And they do. But fear not, there is one way to fix any future bot problems with the most effective Google Analytics spam filter out there. We can filter out any future spam using your Google Tag Manager container code.
The Spam Filter Ingredients You Will Need
Before we get started, let’s make sure we have the right tools in our toolkit. We’ll need Google Analytics and Google Tag Manager.
Read on below.
Google Analytics
We’ll need to be working with Universal Analytics (UA) property type for this to work. As of Fall 2021, the limited filtering options in GA4 do not allow for removing spam traffic. That’s one of many reasons, UA still makes a lot of sense if you’re considering GA4 vs. UA (hint: use both).

Google Tag Manager
This particular Google Analytics spam filter only works based on the unique container code ID associated with your Tag Manager container. In other words, it won’t work if you aren’t using GTM in conjunction with Universal Analytics. You will need to use GTM to deploy your GA (UA) tag on your site. If that doesn’t sound like your setup, you can head over here and learn how to deploy GTM on your WordPress site.

If you’ve got those two ingredients, we’re ready to cook up a tasty spam filtering stew.
Wait! But Does This Spam Filter Work?
You’ve been burned before, you say? You’ve heard promises about spam filters in the past only to be let down? Tried custom segments, used annotations all over the place, and still been frustrated by that infernal spam? I don’t blame you for being skeptical. Before you invest the time in setting this up, check out the proof. I’ve been testing this filter in two of the Views within the Root and Branch Google Analytics account. One of the Views has the filter applied and one does not.
Let’s roll the tape below.
Google Analytics View With No Spam Filter
Check it out. On September 20, 2021, traffic spikes significantly compared to the prior trend. It would be great if this was real, but it was not. We’ve been spammed!
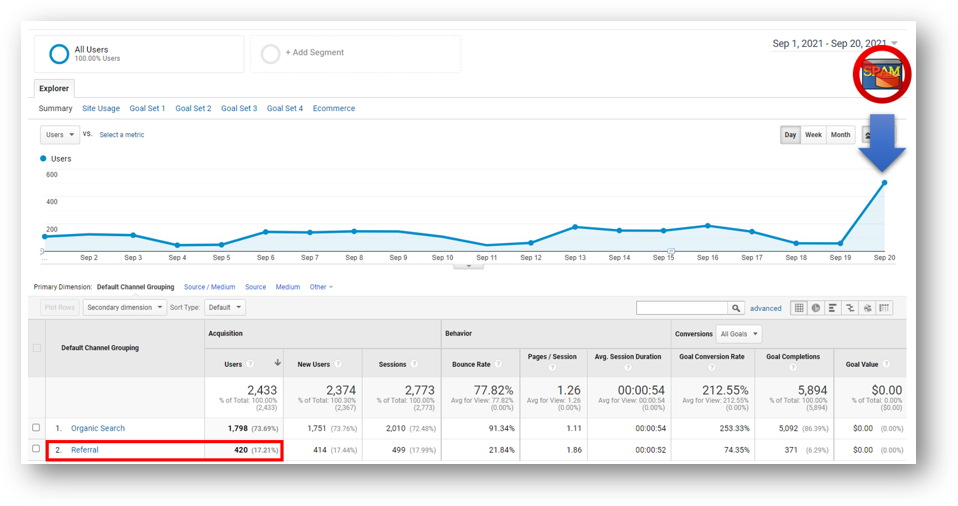
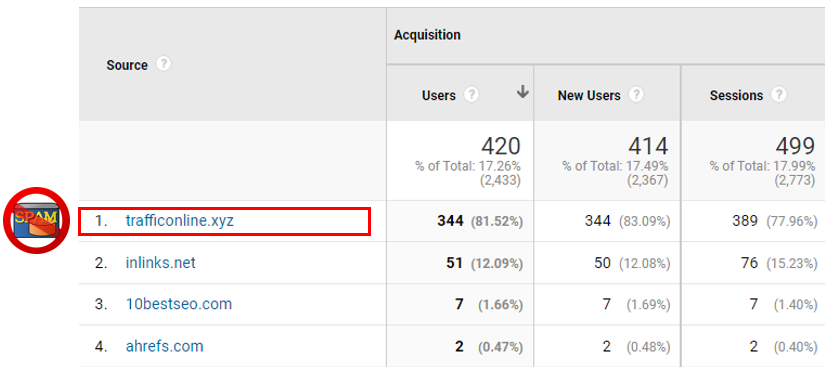
The spam traffic rolls up within the Referral Channel Grouping. If we drill down into that channel, we’ll see that 344 of the 420 total Users in the Referral traffic channel are from trafficonline.xyz. Spamalicious! It’s nice to see some of those other referrers (hey, ahrefs!), but we can do without the fake traffic from our trafficonline.xyz “friends”.
What is trafficonline.xyz?
Trafficonline.xyz offers artificial (fake) traffic to web site owners. Some people believe that this can be a positive for rankings (I disagree, and Google does as well), and this is apparently how they promote their fake traffic service.
If you also are not interested in fake traffic from trafficonline.xyz, you’d likely prefer the View below without any such spam.
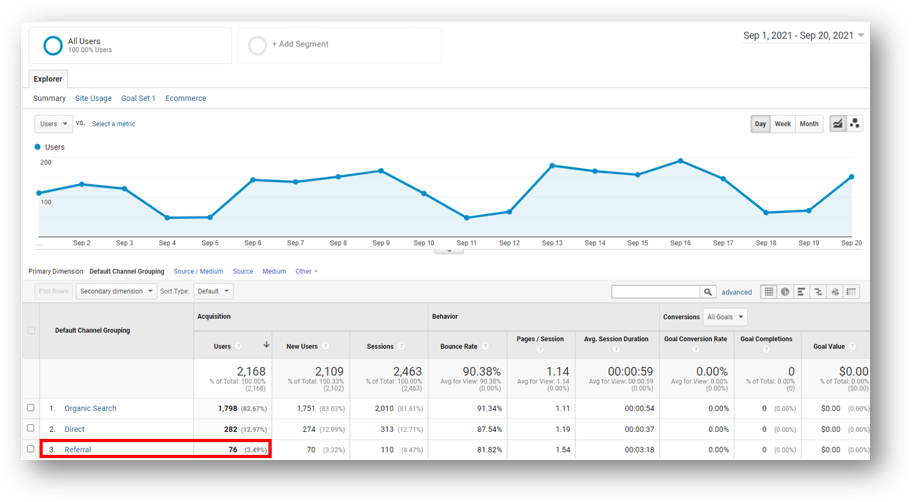
Google Analytics View With Spam Filter In Place
Now, let’s look at the exact same time period from our View with the spam filter applied. Check it out – no spam! In fact, if you look at the Referral traffic in the red box below you’ll see 76 users. And if you bust out your calculators, you’ll see that our 420 Users from Referral traffic in the screenshot above minus the 344 bot hits from trafficonline.xyz leaves us with 76 real humans that we see below.
It works!
Now that we know we’re not wasting our time, let’s build this thing!
The First Step to Spam Freedom: Set a Custom Dimension Within Your UA Variable in GTM
Let’s head on over to Google Tag Manager.
Create a User Defined Variable for Your Google Analytics Property ID
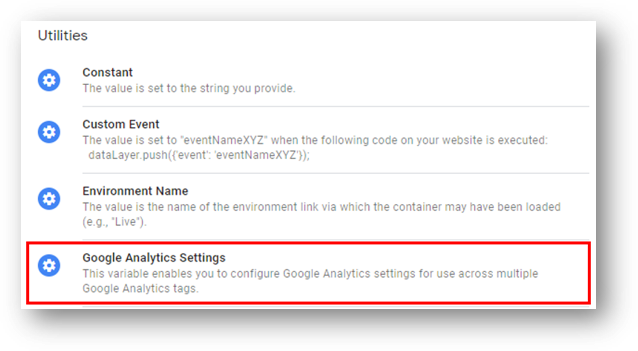
You’ve probably already done this since you’ve deployed your UA property on your site via GTM. However, if you haven’t done so yet just hit “Variables” within the left-hand side navigation. Scroll down to “User-defined Variables” and hit the “New” button.

When you choose your variable type, select “Google Analytics Settings” within the Utilities section.
Finish configuring your user-defined variable by adding your Universal Analytics Tracking ID (UA-XXXXXXXXX-X) in the “Tracking ID” field. If you don’t have this handy, just pop over to Google Analytics and you can find it within the Admin section (you can find it in either Property Settings or Tracking Info).
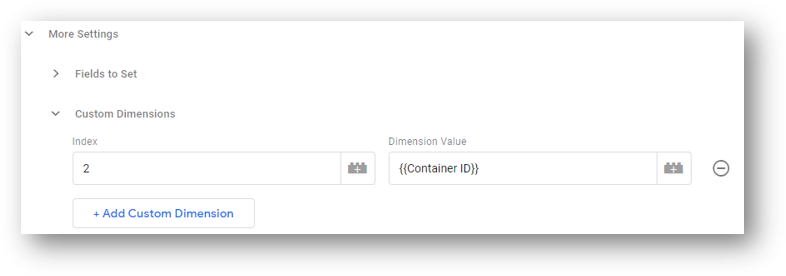
Now Set a Custom Dimension for Container ID in Your User Defined Variable
Your GTM container ID is the unique identification for your specific container tag. It begins with “GTM” and then there are 8 letters. You can see it below with those 8 letters hidden by the orange box. Our Google Analytics spam filter works by only allowing real traffic that is affiliated with that container code by virtue of being a real visit to the site. This doesn’t include bots, which is why they are excluded.

Set a custom dimension within the user defined variable that you just created. Hit the “Custom Dimensions” button and hit the button to Add Custom Dimension. You should use “1” as the Index number if this is the first custom dimension you’ve created. As you can see below, I’ve used “2”, but again you should use “1” if this is the first Custom Dimension you’ve set. In the “Dimension Value” field, add {{Container ID}} as you can see.
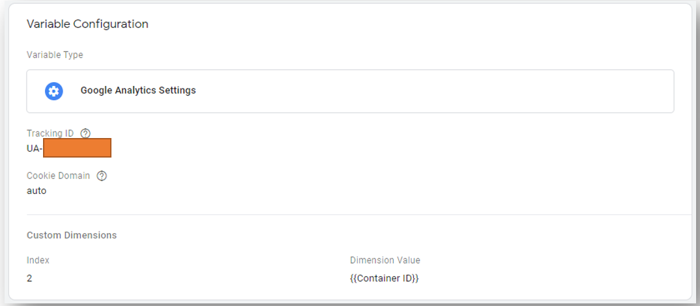
Once you’re done, your Google Analytics user defined variable should look like this.
The Second Spam Filtering Step: Register Your New Custom Dimension in Google Analytics
Now, let’s go over to Google Analytics. With your Universal Analytics property, go to the Admin section (gear icon). Within the Property settings in the middle of the screen, scroll down and hit “Custom Definitions” and then click on “Custom Dimensions” as shown with the blue arrow at bottom left. Then, hit the red “NEW CUSTOM DIMENSION” button.

Create a hit-scoped dimension with the name “Container ID”. The index here must match the index you used when you created the custom dimension in GTM. If this is the first custom dimension you’ve created, the index will be 1.
We’re almost done! The last step in creating our new Google Analytics spam filter is actually to create the filter that filters out that spam.
The Last and Final Spam Filter Step: Create That Filter!
Before you create the final step, you should know that Google Analytics filters permanently alter your data. You may want to create this filter first in a Test View (as I did) to make sure that everything is working properly before you apply the filter in your everyday view. With that caution out of the way, let’s build this thing!
You’re already in the Admin section of Google Analytics. That’s great. Hit “Filters” on the right side of the screen within your View admin settings. Hit the red button to “ADD FILTER”.
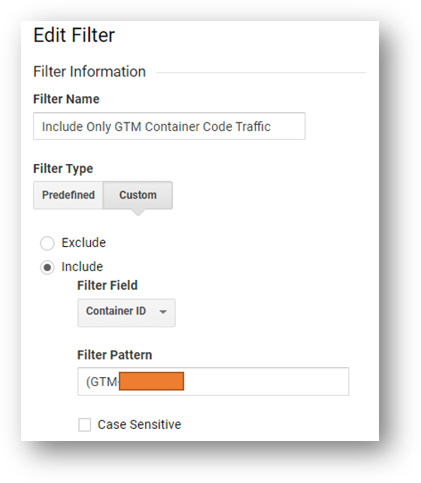
You will create a Custom Filter Type based on the new custom dimension that you have created. This will be an “Include” filter, since we only want to see traffic that is associated with our GTM container code ID. So set “Container ID” as your Filter Field and add your GTM container code as the Filter Pattern as you can see below.
Finally, give it a memorable name.
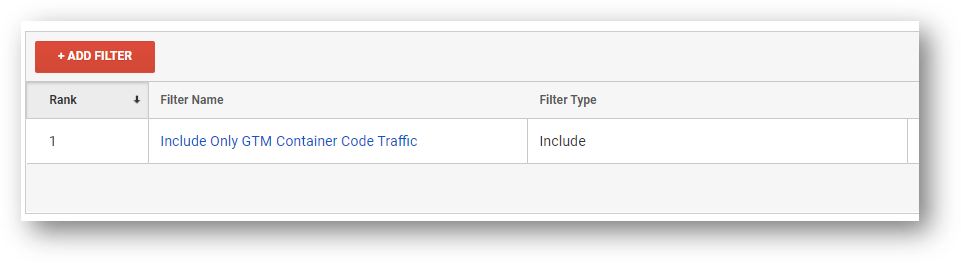
You’ll see this in your filters.
Congratulations! You’re moving on to a less spammy future! If you’re interested in more digital marketing tips and tricks like this, head on over to YouTube and subscribe to the Root and Branch channel. There’s normally at least few new analytics and SEO videos with tips and guides each month.

Final Thoughts
If you have questions or suggestions or your own tips to share, feel free to drop them in the comments below or share on LinkedIn.
Thanks!


I was very much pissed off with this kind of spamming for the last 2 weeks and searching for a solution to stop it. Thanks a lot for sharing such a workable solution to stoping and filtering this spamming.
I feel your frustration! And I’m very glad to hear that this worked for you. If you come across anything else that you think is worth sharing, please feel free.
Thank you for this tutorial.
However I’d be cautious as it seems that 1 week later setting it up, my GA stopped tracking the whole data of my website. I’m not 100% sure it is related to that set up but when I finally removed this filter, data on GA started to be registered again.
Has anyone faced a similar problem after setting up this spam filter ?
Hi Louis,
Thanks for sharing this feedback here, and I’m sorry to hear about your experience. I have not heard about this specific issue before, BUT I am very aware that it’s a real possibility. Filters fundamentally change the way that GA processes the data on the site so if anything is even slightly off, it can have a major impact.
If you end up trying it again in the future, I’d recommend only doing it on a Test View (Google recommends at least 3 views in your GA account: an UNFILTERED view that will always have all data and never any filters, a TEST view, which would be the recommended place to try out new filters like this without causing any harm to your other views, and a MASTER view that is your primary place for viewing your GA data but only has filters applied after they have been vetted in the test view).
In any event, I’m sorry that this didn’t prove successful for you. And I’m glad that you’ve removed the filter and are back collecting data in your GA property! Best wishes to you going forward.