

Google Tag Manager Squarespace Installation Guide
In this blog post, I will guide you through installing Google Tag Manager on your Squarespace website. I’ll discuss the security-related limitations that arise from this method. As a bonus, I’ll explain how to track purchases using Google Tag Manager, and provide a reusable JavaScript code for pushing transaction and customer data to the dataLayer.
Table of Contents
- What is Squarespace
- Get your Google Tag Manager (GTM) container code
- Implement GTM on Squarespace
- Test your implementation
- Limitations of Squarepace “code injection” tool
- Track purchases using GTM
- Closing thoughts
What is Squarespace?
Squarespace is a content management system (“CMS”) that enables the creation of customisable websites or online stores without the need for extensive years of development experience or expertise.
I’ll keep the explanation of Squarespace brief, so let’s transition into the Google Tag Manager implementation phase.
First, let’s outline the steps involved in this process:
- Accessing the view that allows you to copy the Google Tag Manager container scripts.
- Installing the GTM container code on your Squarespace website.
- Testing your implementation
Following these steps, I’ll shed light on some of the limitations of utilising Google Tag Manager on Squarespace CMS, primarily from security considerations. As a bonus, I’ll show you how to set up purchase dataLayer events.
Copying Your Google Tag Manager Container Code
To be able to do this, you must have already created a Google Tag Manager account and a container specifically for your website.
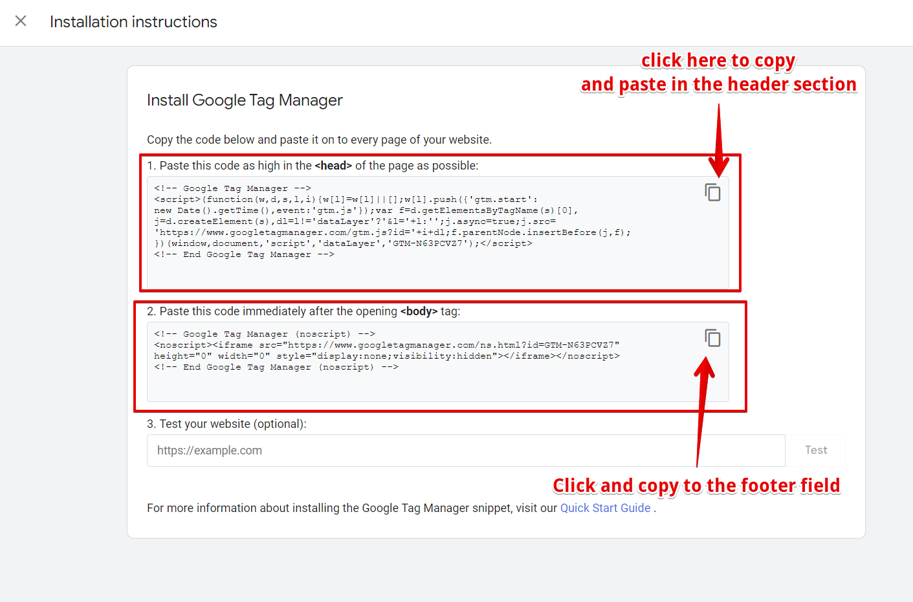
Assuming your website already has a container set up, accessing the Google Tag Manager interface for copying the container scripts is the next step. There are several ways to achieve this within the GTM interface; one option is to click on the GTM container ID situated by the top navigation.
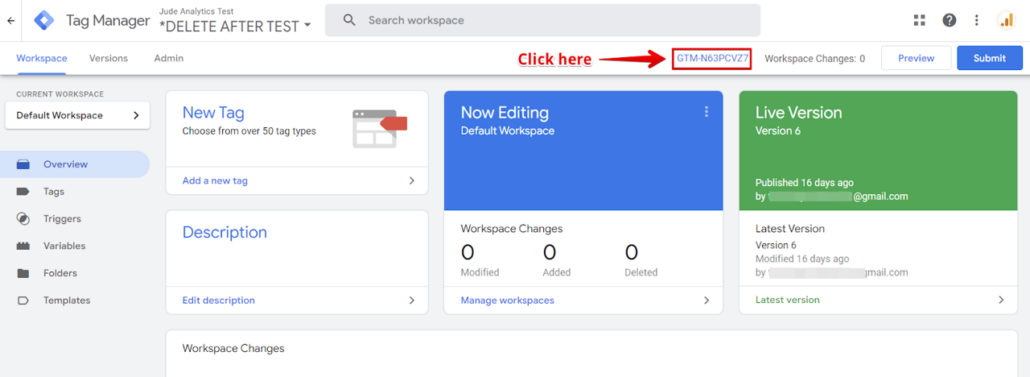
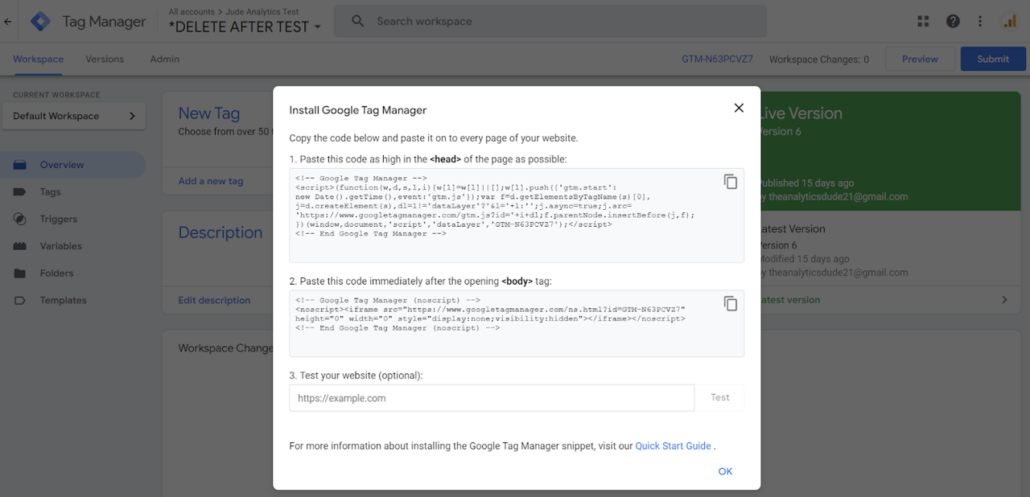
Upon doing so, you will get shown a screen displaying the tag manager container codes intended for installation on your website. Additionally, there is a feature to initiate the testing process for our setup; more to come on this.
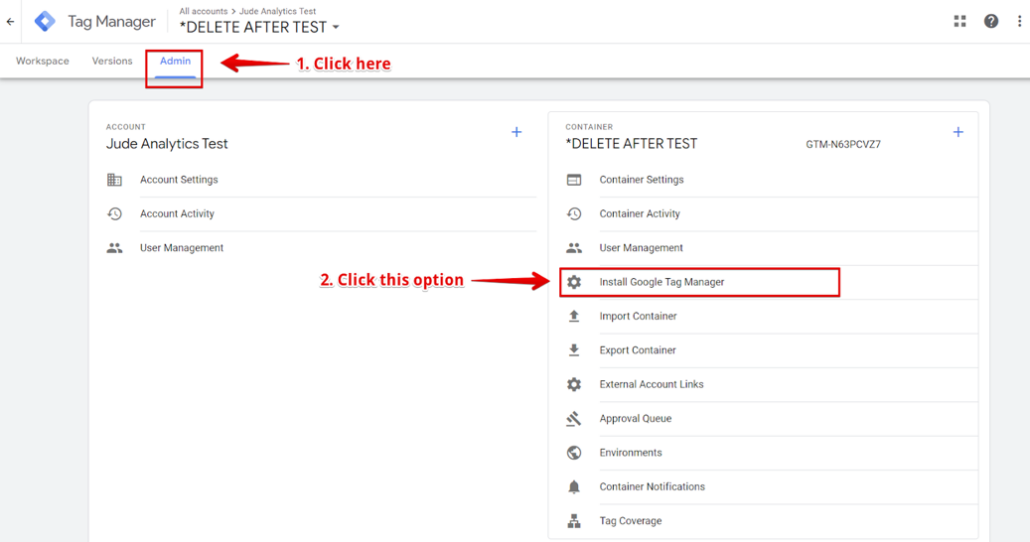
Alternatively, you can navigate to the top navigation.
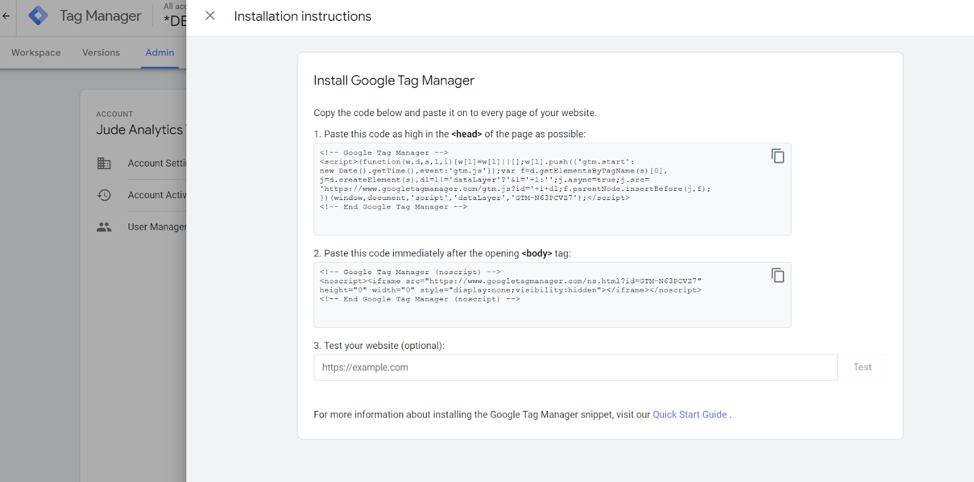
Click on “Admin,” and then select “Install Google Tag Manager” under the “Container” section. This action should lead you to a screen similar to the one encountered earlier.
Now that you have the necessary codes, you can either begin by copying the head code or keep the view open while transitioning to the Squarespace interface, where we’ll be installing these codes by copying and inserting the GTM codes into their respective fields.
Implementing Google Tag Manager on Squarespace
In this section, I will guide you through the process of adding the Google Tag Manager container code to your Squarespace site in four simple steps.
To install GTM on your Squarespace website, you can utilise the “code injection” tool, which allows you to add site-wide scripts to your website.
Follow the outlined steps below to access this tool:
Note: The Squarespace code injection tool is a premium feature available in Business, Commerce, Professional, and Premium plans. If you are on a free plan, this feature may not be accessible to you.
If you prefer a quicker route, you can click on this link to open the Code Injection panel.
However, if you wish to understand the steps and become familiar with navigating to this section of your Squarespace website, follow the steps below.
1. click the “Website” option in your Squarespace admin interface.
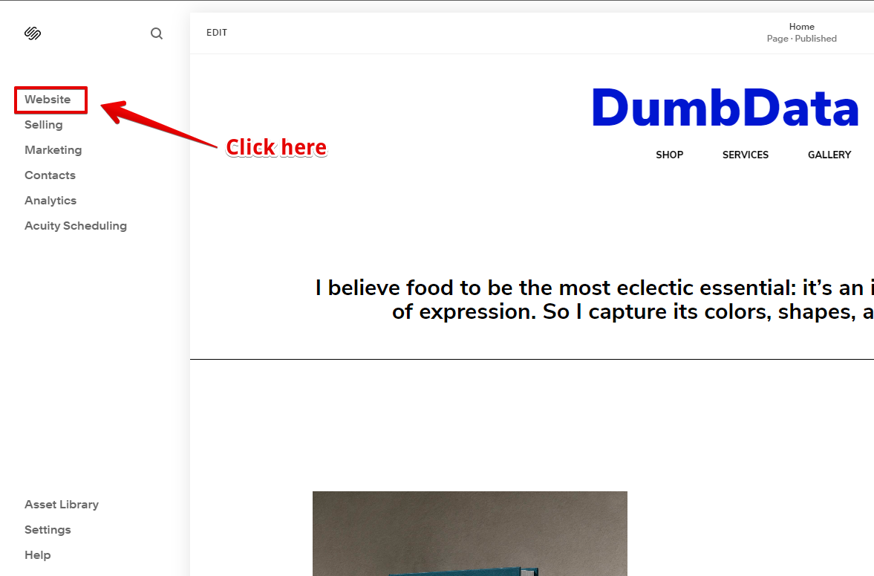
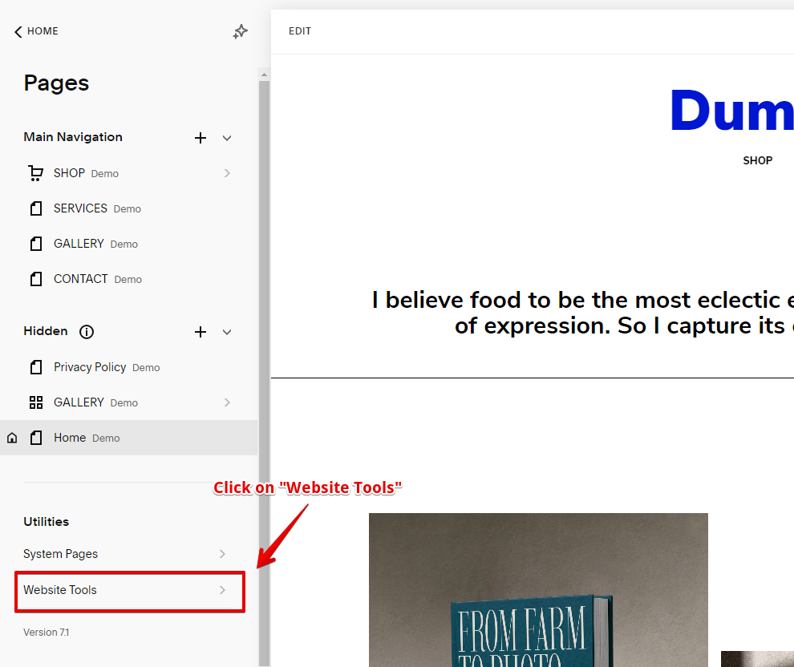
2. This action will open another view where you can select “Website Tools” under Utilities.
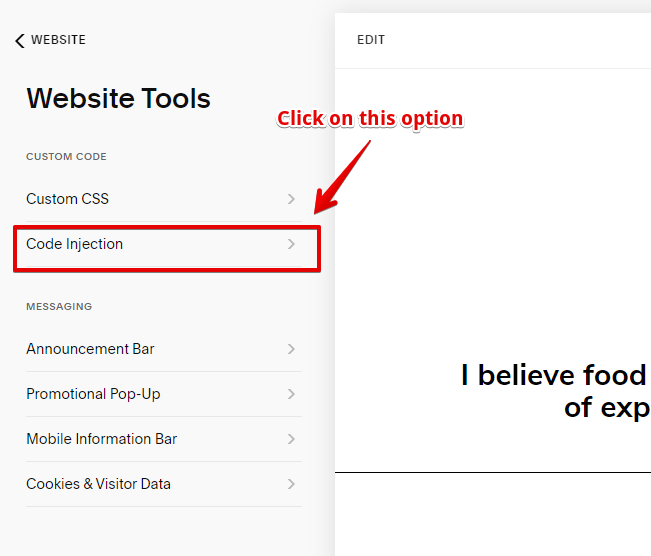
3. Within this view, locate and click on the “Code Injection” option to access the configuration view.
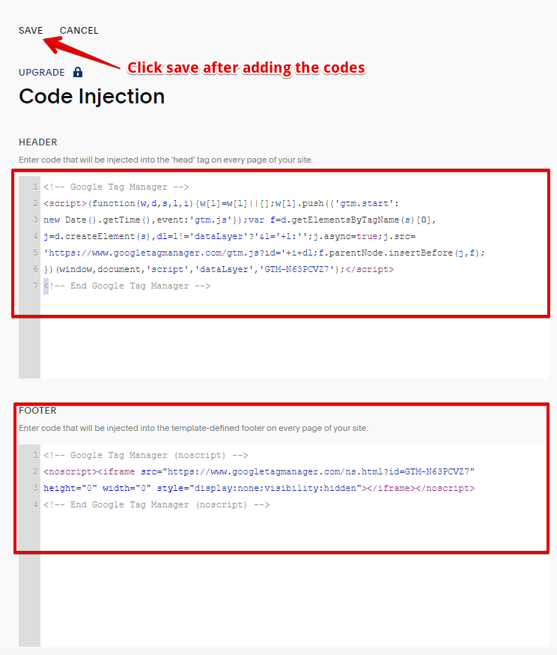
4. In the “Code Injection” view, insert your Google Tag Manager container script and click “Save” once you have completed the process.
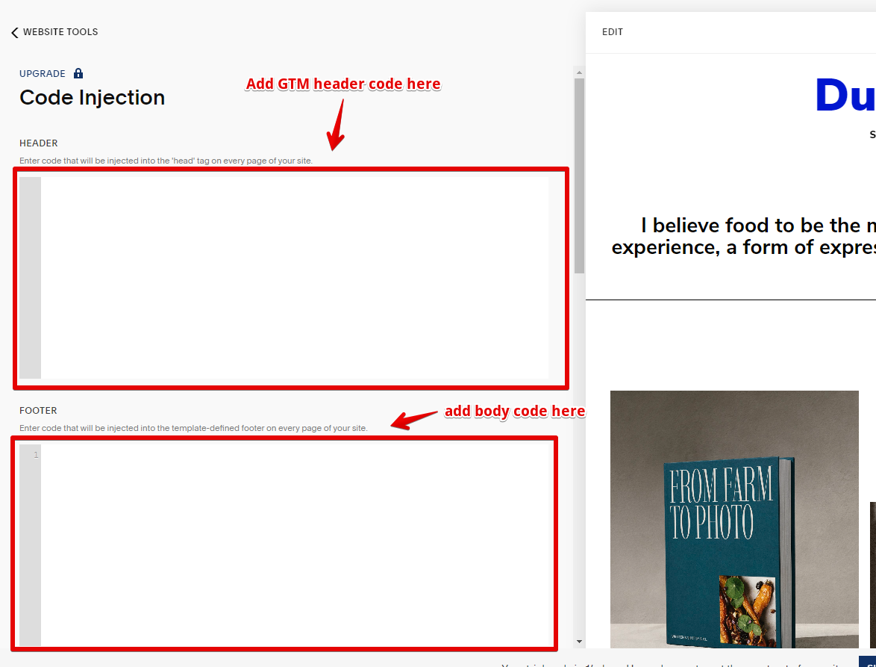
You have to make sure to include the header script you copied earlier or paste the head script into the “Header” field within the “Code Injection” tool. Additionally, place the GTM body script in the “Footer” script section inside the “Code Injection” tool.
Concerning the footer field, there’s no need to worry, as the code added here gets injected before the closing </body> tag on every page of your site. However, keep in mind that your site’s template and version define the footer area.
After clicking save, you should have successfully installed GTM on your Squarespace website.
Testing Your Squarespace GTM Installation
If the GTM container is newly created and has never been published, I recommend you have it published, even if it is empty.
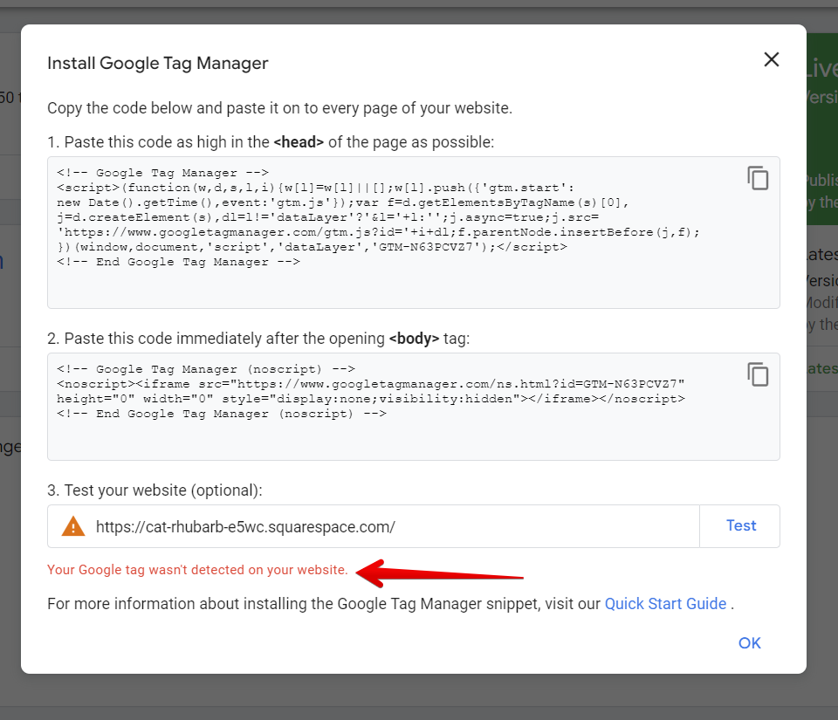
When it comes to verifying whether you’ve correctly implemented Google Tag Manager on your Squarespace website, there are multiple methods available, with the easiest one involving testing your setup using the “Installation Validator Tool” in Google Tag Manager. All you have to do is enter your website URL in the “Test Your Website” field when you open the GTM container code screen.
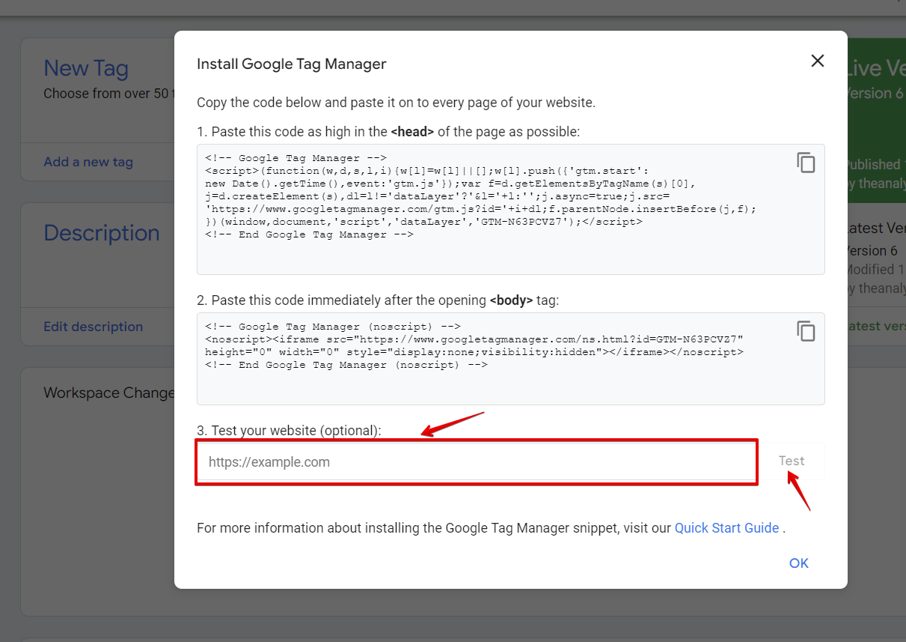
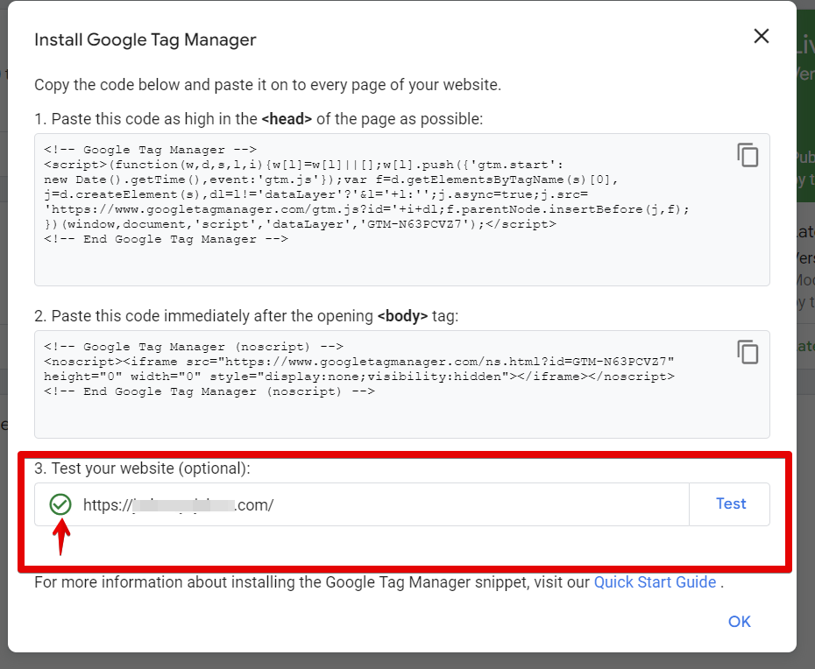
Upon entering the URL and clicking the “Test” button, it should return a green check mark indicating it detected a Google Tag on the website.
For instance, in this live example where I have an empty GTM container installed on the website without Google Analytics or other Google tags, it states that Google Tag Manager is installed on the website
Before using the above method ensure that you’ve published your Squarespace website. If not, you might get an error like the one below.
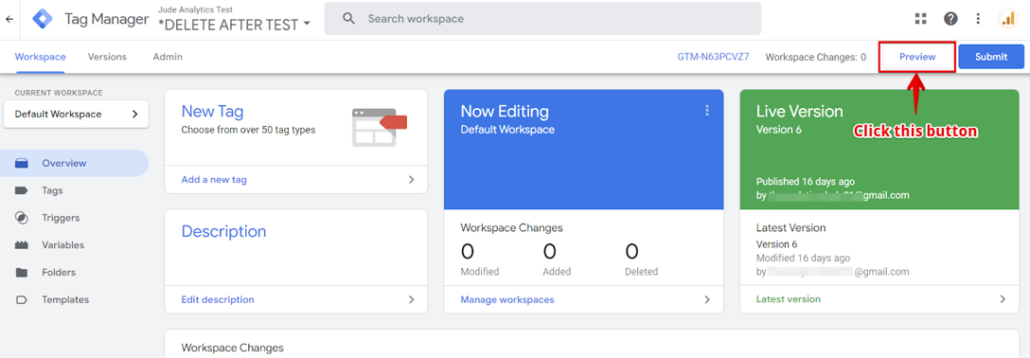
Alternatively, you can use the Tag Assistant” tool, as it’s more efficient and enhanced than the first method. Verifying your GTM installation on your Squarespace website using this method starts with you clicking the “Preview” option in the top right corner.
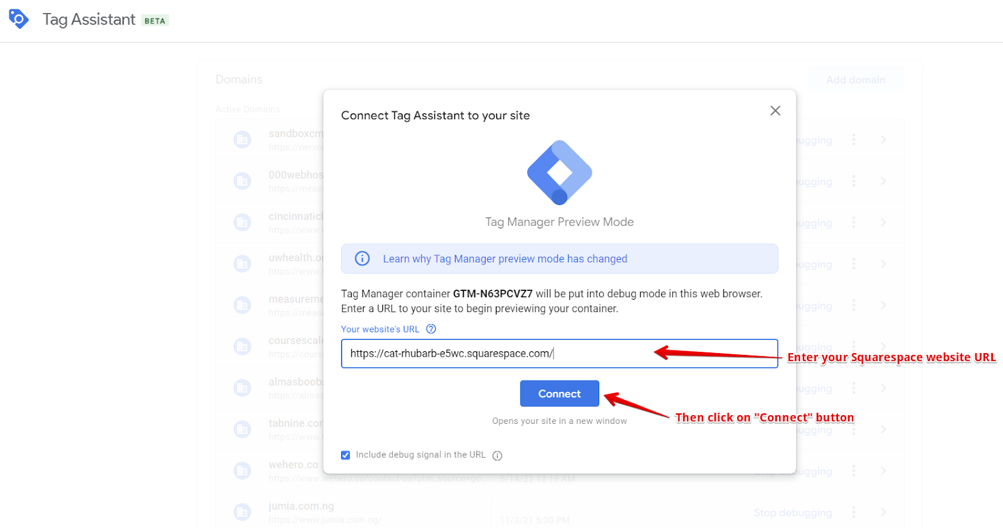
This action should open the “Tag Assistant” view, with a screen asking you to input your website URL and click the “Connect” button.
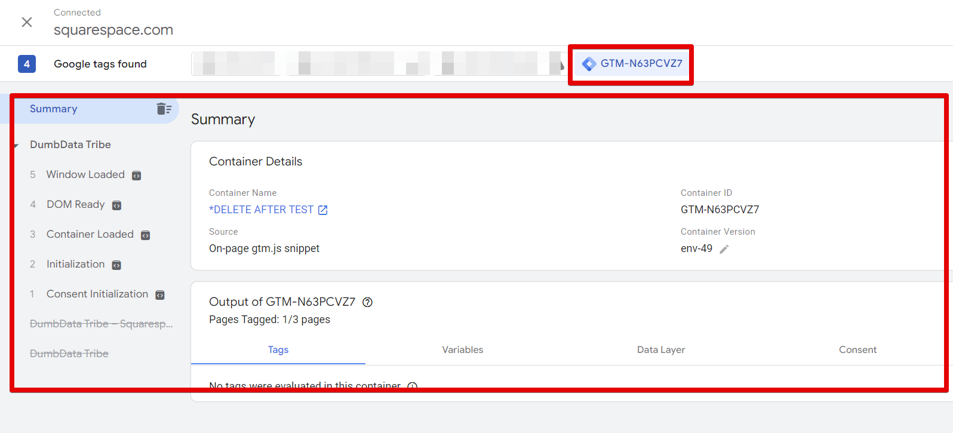
Once GTM gets detected on the website, it should display some information in the tag assistant view and show the message “Tag Assistant Connected“, which signifies that GTM got successfully installed on your website.

You should have a view similar to the one below.
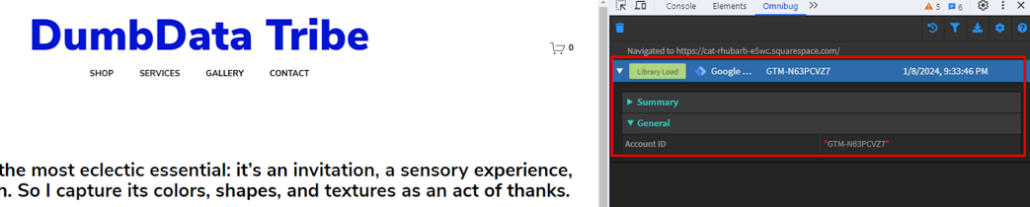
Alternatively, you can utilise Chrome extensions such as Analytics Debugger, Tag Explorer, Omnibug, and others.
Here is an example using Omnibug.
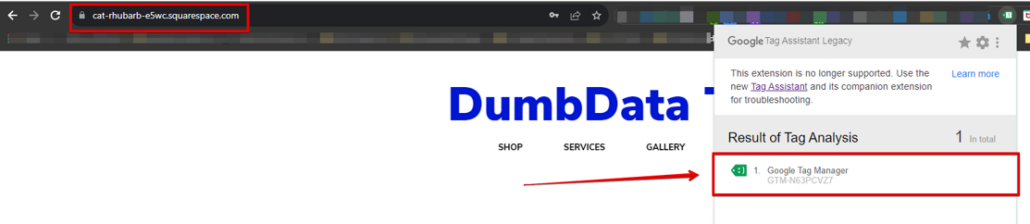
Another option, although not recommended due to its deprecated status of the tool and support discontinuation by the Google team, is to use the “Google Tag Assistant Tag Legacy” Chrome extension. This tool checks and indicates whether GTM is present on the website and if you correctly installed it.
Limitations of the Code Injection Tool
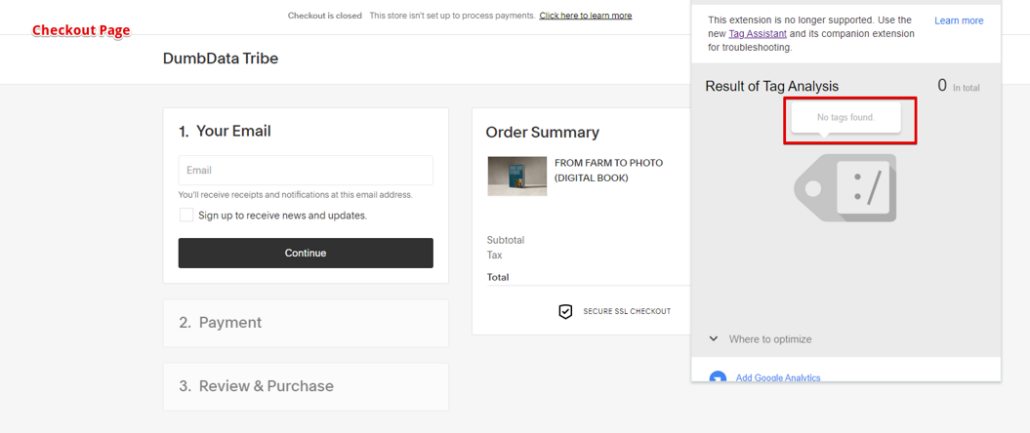
You should know the limitations of using the “Code Injection” tool. These limitations come from security measures that Squarespace implements.
Similar to Shopify (although not on all plans), every code, including the Google Tag Manager container scripts implemented through the “Code Injection” tool, is not executed on the “Checkout Pages.” This means that your Google Tag Manager and the marketing tags and pixels it houses won’t be triggered on the Squarespace checkout pages.
If you’re working with WordPress websites, you can install custom codes like GTM on checkout pages. You can refer to this article if you’re interested in learning how to set up and install Google Tag Manager on your WordPress website.
Tracking Store Purchases in Squarespace Using Google Tag Manager
If you’ve already opted for the Squarespace Google Analytics (GA4) integration (which I highly recommend if you’re considering setting up GA4 on your Squarespace website), then tracking your website’s purchase actions using Google Tag Manager is unnecessary.
However, if you intend to track purchases for Piwik Pro analytics or Ads pixels lacking integration with Squarespace, the information covered in this section will prove beneficial.
To begin, navigate to the same screen as the “Code Injection” tool (I know you’ve heard the word too many times), but this time, scroll down until you reach the section titled “Order Confirmation Page.”
Here, you’ll find a code field that allows you to execute a purchase dataLayer code. The code added in this field is injected into the order confirmation page, appearing after a customer completes a checkout.
When customising the purchase data layer, it becomes essential to pull website transaction data into the data layer dynamically. This can be accomplished using any of the six tags that enable the dynamic insertion of information specific to customer transactions and personal data.
- {orderId} – The order number of the confirmed order
- {orderSubtotal} – The subtotal of the confirmed order
- {orderSubtotalCents} – The subtotal of the confirmed order, in cents
- {orderGrandTotal} – The grand total of the confirmed order
- {orderGrandTotalCents} – The grand total of the confirmed order, in cents
- {customerEmailAddress} – The customer’s email address, as entered in the “Your Email” section at checkout
Since no CMS tag exists for such a use case regarding the currency code, pulling this data relies on either manually entering a currency or using the Squarespace JavaScript object that utilises the currency code of the first item in the order item object.
With all the above-listed insights, below is a sample JavaScript code that you should implement on your Squarespace website’s “Order Confirmation Page.” After adding the code, ensure you click the save button.
Here is the code that uses a static currency code. Change this to what your store uses.
<script>
window.dataLayer = window.dataLayer || [];
window.dataLayer.push({
  event: "store_purchase",
  ecommerce: {
    "transaction_id": {orderId},
    "currency": "USD", // change this currency with your store currency
    "value": {orderGrandTotal},
    "subtotal": {orderSubtotal},
    "customer_email_address": {customerEmailAddress},
  }
});
</script>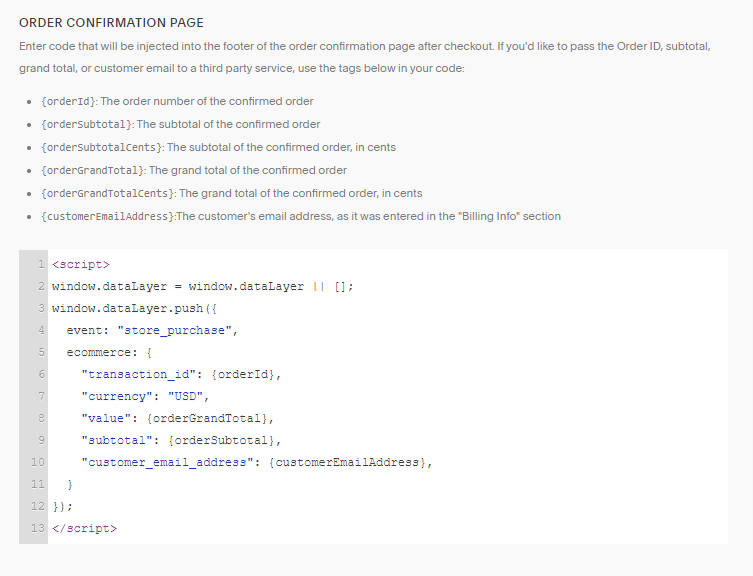
As for a store where customers can place an order using local currency, you can use the code below, which retrieves and uses the currency code of the first item in the purchase item object data.
<script>
window.dataLayer = window.dataLayer || [];
window.dataLayer.push({
  event: "store_purchase",
  ecommerce: {
    "transaction_id": {orderId},
    "currency": Y.Squarespace.CommerceAnalytics._yuievt.events["commerceTrack:commerce-checkout-confirmed"].details[0].grandTotal.currencyCode, //  using the currency of the first item
    "value": {orderGrandTotal},
    "subtotal": {orderSubtotal},
    "customer_email_address": {customerEmailAddress},
  }
});
</script>
Due to the fact that I don’t want to make the setup more complex, you can also pull the item object data, but I won’t be covering that in this article.
Once a person places an order, you can leverage the dataLayer information and integrate it into analytics and ad systems that lack native integration with Squarespace.
Closing Thoughts on Installing GTM in Squarespace
Finally, we’ve concluded this tutorial blog post. Throughout this article, I had the opportunity to provide you with a comprehensive guide on how to implement Google Tag Manager on a Squarespace CMS.
We discussed some of the limitations associated with installing GTM on your Squarespace website using the “Code Injection” tool within Squarespace.
For those interested in tracking purchases, especially in scenarios where Squarespace Google Analytics (GA4) integration is not utilised, and you wish to track purchases through Google Tag Manager (for example, TikTok Pixel purchase conversion or Piwik Pro e-commerce tracking), I shared a code that can cater to such measurement needs.
Installing GTM on your website allows you to leverage GTM to collect data on your website and e-commerce user actions. This data can then be seamlessly transmitted to your Marketing Technology (Martech) tool for measurement and optimisation of advertisements.
I am eager to hear your key takeaways from this article and learn about your experience setting up Google Tag Manager on a Squarespace website.
Short Bio:
Jude is an analytics specialist working with businesses across diverse industries in Africa, Europe, and North America. His passion for writing and assisting non-technical marketers to thrive in the ever-evolving realm of analytics gives him great satisfaction. He co-founded a measurement resource hub called DumbData.


Leave a Reply
Want to join the discussion?Feel free to contribute!