

You’ve Got Mail: How To Integrate MailChimp for WordPress Sites
If you are reading this blog, you most likely have a WordPress website (or at least are considering one!). Within your daily website traffic, you have a captive audience ready to further engage with your brand. The question on your mind might be, “How do I engage with them?” One way to do so is through email.
According to Litmus’ most recent email marketing data for 2020, 78% of marketers have seen an increase in email engagement over the last twelve months. From the Tech industry to ecommerce companies, email marketing efforts are receiving an average ROI of $42 for every dollar spent. From this data alone, we can draw an important conclusion: email marketing is worth it!
With email marketing platforms like MailChimp, you can refine your email marketing efforts by focusing on important facets like segmentation, personalization, and experimentation. Before this, however, you must grow your lists.
WordPress and MailChimp Integration
One way to attract new subscribers is to integrate MailChimp for WordPress. WordPress has many available integration plugins to choose from, all boasting their own notable features. Amongst these plugins, there are two types for integrating MailChimp for WordPress. They are a form builder plugin with MailChimp add-on integration and a dedicated MailChimp integration plugin. With a form builder plugin, you receive more robust form building options, more choices with form styling, and even more integration options to segment your contacts further – whether you choose to include them in your email marketing efforts or to add them to your sales contacts. Unlike with a dedicated MailChimp plugin, you can utilize a form builder plugin for all your form needs.
Formidable Forms is a scalable and adaptable form builder plugin with a straightforward set-up process. Follow these 7 steps to connect your MailChimp account and WordPress site with Formidable Forms today.
Step 1: Access Your MailChimp Account
If you haven’t yet signed up for a MailChimp account, this takes only a few minutes. MailChimp has tiered plans depending on your business needs – such as the number of MailChimp users, the amount of email subscribers, and more. If you opt in for a paid account, you will have a couple of extra steps and access to more targeted emailing features.
Once you have an account, next you must verify your account, enter your business info, and create a new audience. You need at least one audience (or list) to start out with. This creates a specific place for your incoming contacts to be added to.

Step 2: Locate Your MailChimp API Key
Your MailChimp API key is like your pin to your banking account. You can generate keys in your MailChimp account for integration with other platforms like Formidable. For MailChimp to interact with the contact forms on your website, your forms need authorization before sending any data. This is where your API key comes in to create that vital link.
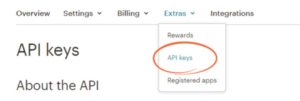
To generate a key, log into MailChimp, go to Account > Extras >API Keys. Generate a key (or use an existing one), and keep this tab open. You will need the API key in a later step.
Step 3: Install and Activate Formidable Forms
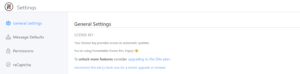
Next, you can install the Formidable Forms Plugin. From your WordPress Dashboard, navigate to “Plugins” and then to “Add New.” Search for ‘Formidable,’ and click the “Install” button. After you have installed the free version of Formidable Forms, update the settings under Formidable > Global Settings > General Settings to access the Premium version of Formidable.
To integrate MailChimp into your contact forms, you will need access to any of the premium tiers of Formidable. This will require your license key if you purchased directly from the site, or you can purchase at this point via the link.
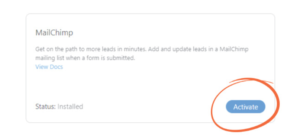
Step 4: Install Formidable MailChimp for WordPress Add-On
Now let’s install and activate the specific MailChimp for WordPress add-on! With Formidable Forms, you can create a variety of customizable sign ups and contact forms for your WordPress site. With the MailChimp for WordPress add-on, you will be able to create contact forms within Formidable that integrate specifically with MailChimp data points and audiences.
Step 5: Connect Your Accounts
It is time to connect your WordPress site with MailChimp. Navigate to your WordPress dashboard then to Formidable > Global Settings. Click the MailChimp tab. Using that MailChimp API key you saved from earlier on in Step 2, type in or paste the key. Click the “Update” button in the top right-hand corner, and your connection will be established!

Step 6: Create a Form in Formidable
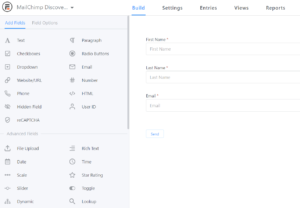
If you haven’t created a contact form, it’s time to do so. One of Formidable’s best features is its easy-to-use drag and drop form builder. You can choose from multiple fields to create completely custom forms, or you can edit one of the pre-made templates. You can also save one of your own forms as a template to use on your WordPress site in the future. In addition, all forms built can either be integrated to have your site’s styling or its own unique colors and padding.
Choose from standard fields such as name and email address and add specialized information like a reCAPTCHA or dropdown list. As you add fields, make sure to thoughtfully consider what is important to know about your future contacts. You want to make your forms are helpful for you while remaining concise, reducing the time commitment to fill out a form for your users.
Step 7: Add the MailChimp Form Action to Your Form
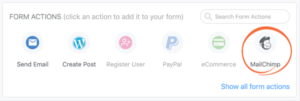
Finally, to finish your contact form and make sure emails start funneling to your MailChimp account, add a MailChimp form action to your new form. To do this, find your contact form and click “Settings.” Navigate to “Actions & Notifications.”
Once here, you will see a variety of options available. Formidable has an array of add-ons that allow you to complete valuable next steps. Depending on the needs of those who fill out a specific form you have created, you can register a user for a specific function, complete a PayPal action, or in this case, sign that user up as a MailChimp subscriber. Add the MailChimp form action to your contact form.
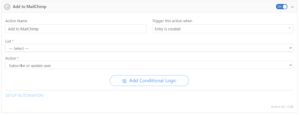
From there, select the specific MailChimp audience (or list) where you would like to add your new subscribers to. The audience you created in the beginning (and all audiences in your MailChimp account) should be visible in the drop-down menu titled “List.” Select all other options and conditions desired. Once finished, update all changes with the “Update” button in the top right corner. And just like that, you did it!
What’s Next?
Once you have added your contact form to one or multiple points on your WordPress site and started gathering those subscribers, it’s time to engage with your contacts! A great place to start is by setting up a “Welcome” email or email series to say hello. MailChimp allows you to trigger automated emails with numerous criteria, one being once an email address is added to a list. Greeting new contacts soon after they take a step to get to know your brand is like returning a wave or high five to a new acquaintance on the street. Immediately, you can begin to strengthen your budding relationships.
If you’re interested in talking about automations, email trends, or more digital marketing training, get in touch with us here. We’ll see you in our inbox!


Leave a Reply
Want to join the discussion?Feel free to contribute!