
GA4 Button Click Event Tracking: Set Up Guide With GTM
Button click tracking allows you to collect data every time an important button on your site is clicked. This guide walks through the process of setting up GA4 button click tracking. It includes an embedded tutorial of the same.
Tracking button clicks can be an important part of setting up Google Analytics measurement ecosystem. Unlike some other interactions, button clicks can’t usually be tracked by GA4’s built-in enhanced measurement events. Instead, button clicks require a custom event.
Why Would I Want to Track Button Clicks?
There are at least two good reasons to track button clicks. You might want to look at all the places that your visitors are clicking on your site. This might show you places where people are confused and trying to engage with elements (like images) that don’t interact. It might give you ideas for how to configure internal links to help your visitors get to where they want to go.
Another reason to track button clicks is to measure how your visitors engage with important buttons on your site. These are buttons tied to your important conversion actions on your site. We’ll use this second use case as our example for this guide.
We’ll look at how we’ve set up button click tracking on this website to see when visitors click a button like this one to subscribe to the Root and Branch YouTube channel.
![]()
![]()
You can watch the video below for a complete tutorial through the entire process. You can also read the written version if you’re not a video person.
Does GA4 Automatically Track Button Clicks?
For the most part, no. GA4 does not automatically track button clicks. GA4 can automatically track clicks on outbound links (clicks that go off your domain) and clicks to file downloads. This tracking is through the built-in enhanced measurement events. However, there is no built in solution for tracking any button clicks that go to another page on your domain or for button clicks that don’t go to a link destination.
In general, I believe it’s best to forget about enhanced measurement for measuring button click activity.
Instead, we’re going to need to bring in the help of Google Tag Manager to create a GA4 custom event tag. If you’re confused about the difference between enhanced measurement events and custom events, you might want to read about GA4 events first. Otherwise, read on for more about recording those button clicks.
Why Do I Need Tag Manager for GA4 Button Clicks?
It is possible to create some custom events in GA4 without the help of Google Tag Manager. But for most custom events like button click tracking you’re going to need to create a a GA4 event tag. that event in GTM and pair it up with a proper trigger.

Here are the major steps in the process.
Button Click Tracking Process in Brief
- You’ll need to have a Google Tag Manager container code installed on your website. Here’s how to install GTM if you don’t have that up and running yet.
- The GA4 Configuration tag must be set up within your GTM container code.
- Configure your built-in click variables. This is far simpler than it sounds.
- You will need to create a button click trigger that specifies the conditions you want to track in your button click. There are multiple ways to set up your trigger and this will depend on the specific button you want to track and how your site is set up. The embedded video reviews the process for setting up a link click trigger (using the destination URL of the button click) and also for using an all click elements trigger (using the click classes of the button you’re tracking).
- You will need to create a GA4 event tag with an event name that will show up in your GA4 reports.
- If you want to send additional data with your button click event, you will set one or more event parameters. In our case, we’re going to send in the click text of the button that we’re tracking.
- You must pair your GA4 button click event tag with your button click trigger.
- After testing to confirm all is working as expected, you will need to publish your GTM container to make your tag and trigger live.
- Register a custom dimension in GA4 for any event parameters that you set in your event. This was an incredibly confusing part of the process for me since it’s very different from how things work in Universal Analytics. If you’re in a similar boat, you can read all about event parameters and custom dimensions to get up to speed.
The video above walks through the full process. But if you only want to see what the trigger and tag look like, read on below!
Let’s take a look at the button click tracking trigger.
What Does the GA4 Button Click Trigger Look Like?
As mentioned above, there are multiple ways to set up your trigger.
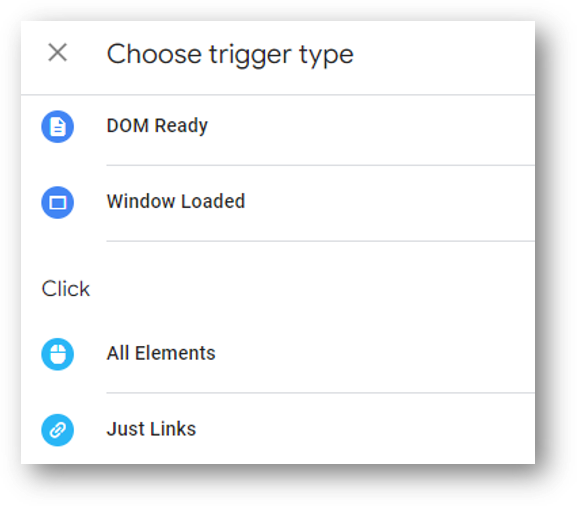
Perhaps the simplest way to is to use a a link click trigger and isolate the conditions of the trigger to the click destination of the button you want to track. To create a link click trigger, create a new trigger in GTM and then select the “Just Links” trigger type which you can see at the bottom of the image below.
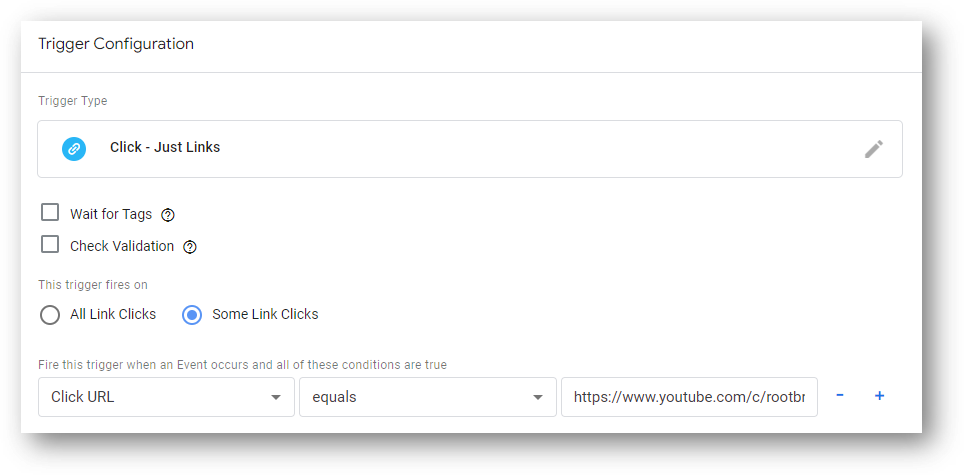
Here is what the finished trigger looks like. Set the trigger to fire on “Some link clicks” and set the condition so that the Click URL to fire on the destination URL of the button click. Note, this obviously will only be effective for your purposes if your button clicks through to a destination URL. It will not be effective if there are multiple ways to get to that destination URL since the trigger will fire each time a link to that destination is clicked.
In our case, this trigger is only effective for tracking the button (subscribing to the YouTube channel) if the button we want to track is the only way to get to that destination from the site.
That’s why you may need to consider a different way to set up your button click event.
Another Way to Set Up Your Button Click Event Trigger: Click Classes
The second way to track button clicks is using something called the “click class” of the button. Click classes returns the value of the class attribute of the HTML element that was the target of the action. In other words, the target action (the button click) generates an attribute associated with the button that we can use in our trigger.
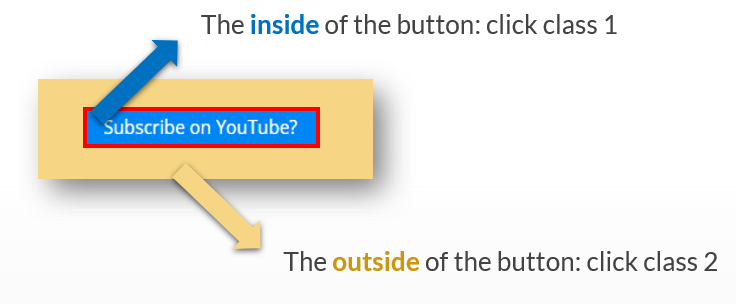
Full credit to Julius Fedorovicius who points out that there are likely multiple click classes that we need to deal with in our button click trigger. One click class controls the inside of the button (where the title of the button is). Another click class controls the outside of the button click.
Check that out below for our YouTube subscribe button.
We’re going to need to set up two different triggers to track our button through Click Classes with the All Elements click trigger.
Tracking the Inside of the Button Click
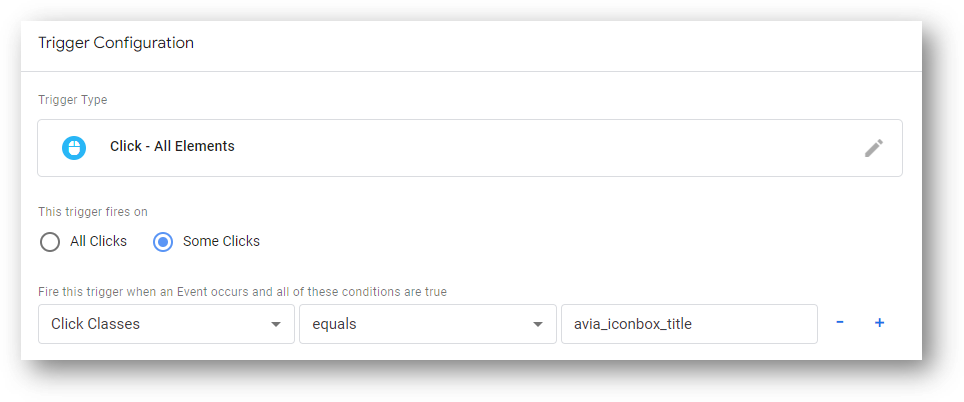
Remember when we selected our “Just Links” trigger type for our first trigger configuration? To use Click Classes instead, we select “All Elements” instead.
Here is our trigger for the inside of our button click. The trigger fires on Some Clicks where the Click Class is equal to avia_iconbox_title. How did I know to set this as the Click Class? That’s all about using Preview and Debug Mode in Google Tag Manager and seeing what Variables are output when your target click occurs. If you could use a hand with that, check the video.
Tracking the Outside of the Button Click
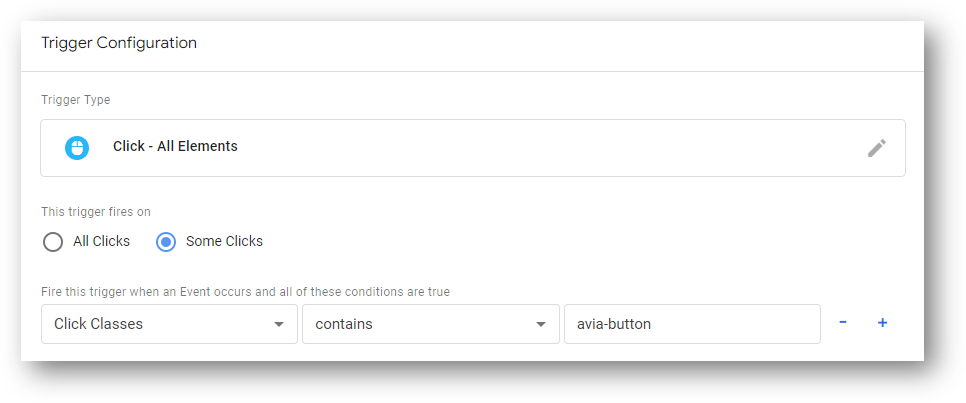
Since not everyone will click on the inside of the button, we also need to create a second trigger. This trigger will capture all clicks on the outside of our target button.
Here is the trigger for the outside of our button click. The trigger fires on Some Clicks where the Click Class contains avia_button. Once again, I used Preview and Debug Mode in Google Tag Manager. You can see what happens when the target click on the outside of the button happens.
If you’re using this second method of setting your button click trigger, you’ll need to use both triggers in your corresponding GA4 button click tag. Let’s take a look at that tag now.
The GA4 Button Click Event Tag
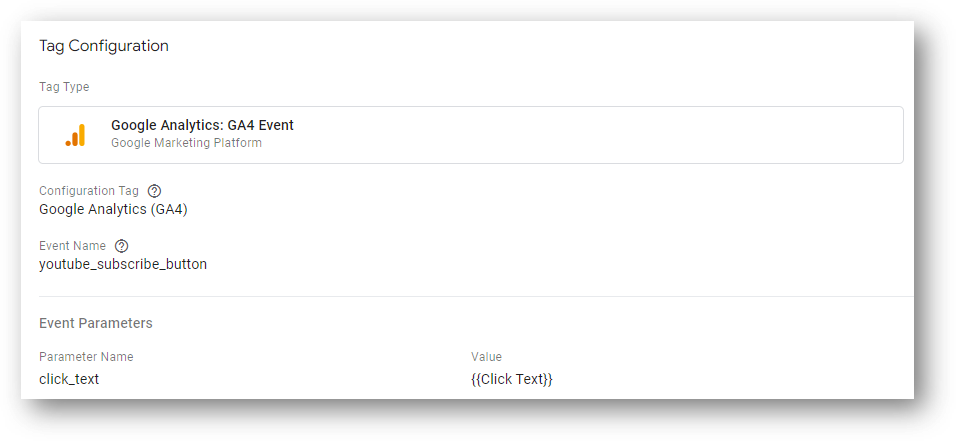
The tag type is “GA4 Event.” You make this selection when you select your GA4 Configuration tag.
The Event Name is what will show up in your GA4 event data. You can see that this event is called youtube_subscribe_buton. If you want to call yours youtube_time or yt_button_of_awesomeness, you are free to do so. But in general, shorter is better. And I recommend you use the snake case naming convention. Snake case means lowercase letters and underscores instead of spaces.
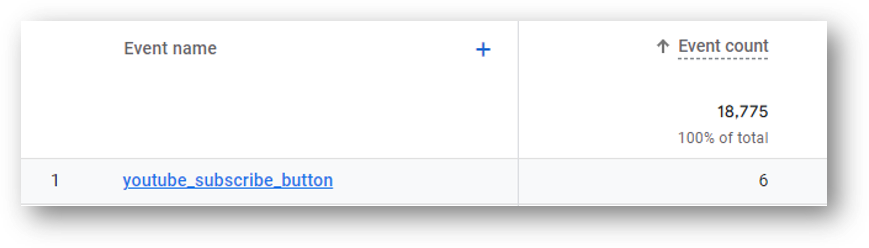
You can see that same event name in our tag above showing up in our GA4 report below. To access your events in GA4, check out the “Engagement” reports and then select “Events.”
An important note: you absolutely *must* set an event parameter in your GA4 event tag using the variable {{Click Text}} if you want to pull in the text of the button that is clicked. This might not be necessary for your purposes, so consider your own situation. If you do register this event parameter during your set up work in Tag Manager, there is another step for you to take in GA4. That step is registering a custom dimension for your event parameter and is step 9 from our initial list above
Pair the Button Click Tracking Event Tag and Trigger
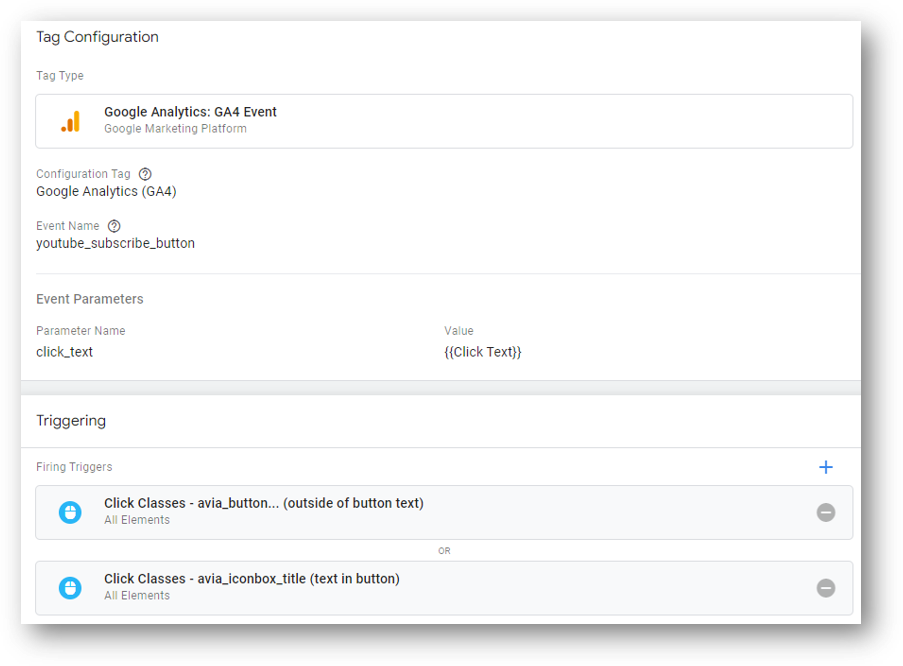
The trigger’s job is to identify when some important action has taken place. In this case, that important action is the button click. The tag’s job is to send data to GA4 when the trigger fires. Neither are enough on their own. But together, they create a powerful custom button click event and can lead to useful data.
Here is our button click event tag paired up with our two firing triggers for the inside and outside of our button. If you use the link click trigger instead, you’ll only see that one trigger paired here.
A Note about Built-In Variables
If you haven’t already configured your built in click variables in Google Tag Manager, you must do so.
What’s a Variable in Google Tag Manager
Here’s what Google says from their support article:
Variables in Google Tag Manager are named placeholders for values that are populated when code is run on your website or mobile app. For example, the Tag Manager variable named “Page URL” returns the current web page URL.
In our case, we’re using either the ‘Click URL’ variable in our trigger OR we’re using the ‘Click Classes’ variable in our trigger. And if set an event parameter when setting up our tag, we are using the ‘Click Text’ variable. You can see all three of them in the list below. The entire process of configuring them involves toggling on the check boxes.
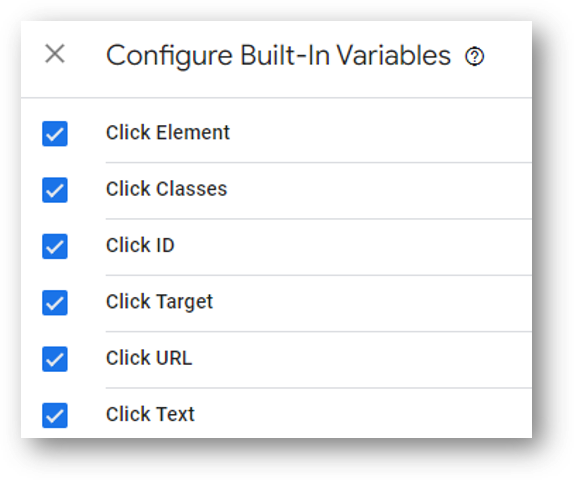
So make sure that is done! You can check in “Variables” in the left-hand navigation in GTM. Then select “Built-In Variables” and turn on any variables you need.
Final Steps
The last steps are to test your GA4 event tag in Google Tag Manager’s Preview Mode. After you can confirm it’s working, publish the container.
If you set the {{Click Text}} event parameter in your tag, register a custom dimension in GA4 for the click_text event parameter data that is being sent with your event. This will allow you to see the text of your button click in your report data.
I hope you are fully up and running with the proper GA4 installation and configuration. If not, this 10 step guide may be useful.
Looking for something else? Feel free to leave a note in the comments or on the Root and Branch YouTube channel at youtube.com/@rooted-digital. We’re always looking for new content ideas.
Wrapping Up
If you’re still someone learning about GA4 (as I am), I’d recommend checking out this GA4 vs. UA comparison or this list of updated GA4 questions. You can also subscribe to the Root and Branch YouTube channel for an updated video every week or so. I’ll see you there! There are explainers and tutorials for tracking like this.
- GA4 page timer tracking
- Bounce rate in GA4 vs UA
- The truth about Event Parameters in GA4
- How to set up a GA4 form submission conversion
- How to see UTM tagged campaign data in GA4
- How to create the Source/Medium traffic report in GA4
- How to set up a custom dimension in 7 steps (and why you need to if you want to see event parameter data)
- Goals in GA4 explained vs UA
- How to link Google Ads and GA4
- How to link Google Search Console and GA4
About Root & Branch
Root & Branch is a certified Google Partner agency and focuses on paid search (PPC), SEO, Local SEO, and Google Analytics. You can learn more about us here. Or hit the button below to check out YouTube for more digital marketing tips and training resources.

")


Trackbacks & Pingbacks
[…] creating custom events within GA4 or using Google Tag Manager to create more complex events like button click tracking or using trigger groups to track scroll depth and dwell time, you’re still collecting […]
[…] Here’s how to do GA4 button click tracking […]
[…] second option for creating GA4 events does require the help of Google Tag Manager. Things like button click tracking, custom scroll tracking, internal link click tracking, page timer tracking, and more all fit in […]
[…] the GA4 configuration tag. Tag Manager can also create custom GA4 event tags for things like button click tracking and custom scroll depth […]
Leave a Reply
Want to join the discussion?Feel free to contribute!