
GA4 Setup Tutorial: 10 Steps to Install and Configure GA4
It’s happening. GA4 will be the only Google Analytics option in July 2023. If you want a solid GA4 setup, this guide will show you how to install and configure your GA4 setup in 10 steps.
Google made a big announcement on March 16, 2022. Universal Analytics (UA) will be deprecated at the end of June 2023. Google Analytics 4 will be our only option beginning July 1, 2023. If we’re going to keep using Google Analytics, it’s time to start getting comfortable with the new platform. This setup and configuration guide is a great way to get started. Check out the guided video tutorial below or read on below if you’d prefer the written version.

Note: if you’re uncertain about the difference between the two Google Analytics property types, you may want to check this guide to GA4 vs UA first. Otherwise read on below. Steps 1 and 2 deal with creating your new GA4 property and installing it on your site. If you’ve already done that, skip down to #3 so you can review and adjust your session timeout settings.
Create Your New GA4 Property (#1)
If you’re getting ready for GA4, there’s a good chance you already have a Universal Analytics property. If that sounds like you, simply log in to Google Analytics at analytics.google.com. Click the gear icon in the bottom left portion of the screen to access your Admin settings.
You’ll see 3 columns with settings at the Account level, Property level, and View level. Within the Property settings in the middle of the page, hit the blue button to “Create property.”
You’ll see a screen that looks just like the one below. Give your property a name, select your time zone, and confirm that your currency setting is correct. The proper time zone will ensure the dates in your reporting are accurate.
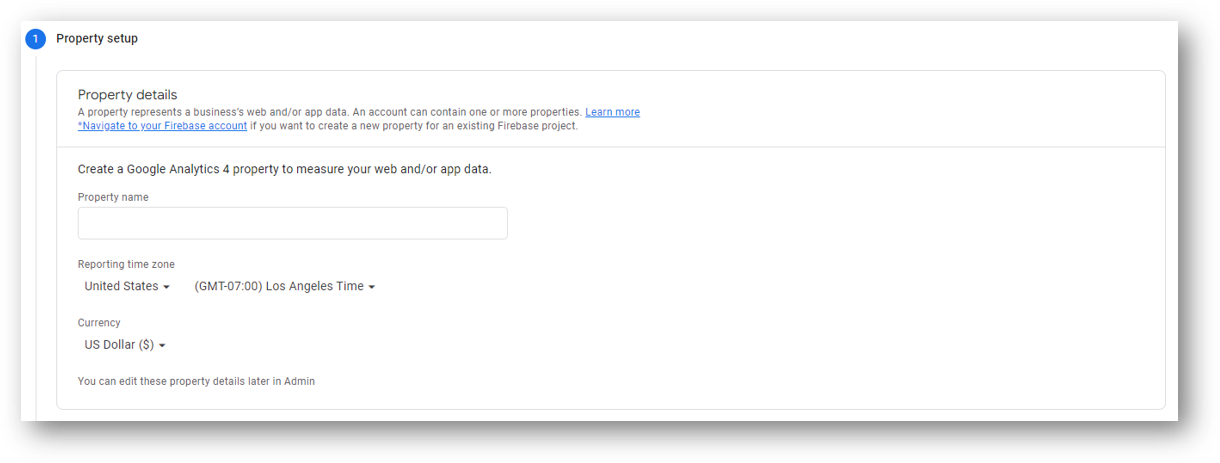
Then hit the blue “Next” button and fill in some basic information about your business including your industry, the size of your business, and how you plan to use GA4.
Hit the blue “Create” button. Step one is done!
Install the Google Analytics 4 Tracking Code On Your Site (#2)
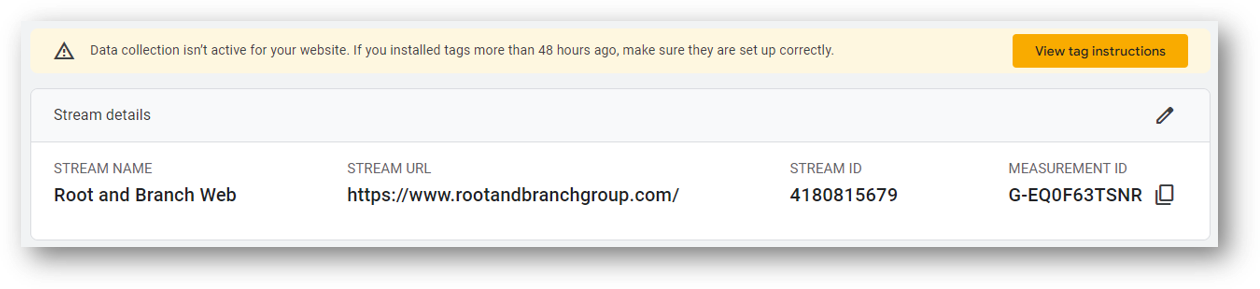
Congrats! You now have a new GA4 property. This is a great start but it won’t get you any data if you don’t install the tag properly on your site. After completing step #1, you should see a screen very similar to the one below. Do you see the “Measurement ID” in the bottom right of the image below? This is the unique identifier that will tie your web property to the Google Analytics 4 property that you’ve just created.
All you need to do is get a piece of tracking code with that unique Measurement ID installed on the backend of your site.
The best and simplest way to do this is install GA4 with the help of Google Tag Manager. You’ll create a new “GA4 Configuration” tag (see immediately below), and enter your unique Measurement ID. After pairing your tag with a trigger to fire on all page views, you can publish your Tag Manager container code and GA4 is officially on your site!

For a full video overview of the process, this embedded video shows all the steps in about 5 minutes.
There are other ways to install GA4 without Tag Manager (you can hardcode the tracking code into the backend of your site, or use a built in integration like this Wix integration), but Tag Manager is the most ideal. If you aren’t yet using this powerful tool, here’s how to install GTM on WordPress.
Now you have GA4 officially installed on your site. Let’s keep going.
Adjust Session Timeout Settings (#3)
A GA4 session on a website ends after a visitor leaves the site or has been inactive for a period of time. The default “timeout period” is 30 minutes. But this may be too short for a lot of websites. For example, if you have a content-heavy website, it’s likely many of your readers are temporarily abandoning your site for another activity before coming back to finish an article. For example, let’s say a visitor is reading a detailed blog on your site and leaves for a 45 minute lunch break. After coming back from lunch, they resume reading on your site. But their session timed out at 30 minutes, so when they resume their session it actually triggers a new session to be counted. This is a great reason to increase your session timeout.
Within the Admin section of GA4, click in your Data stream. Then select “Configure Tag Settings” from within your Google tag settings. Then select “Show All.” You’ll see the option to “Adjust session timeout” as shown below. Click it.
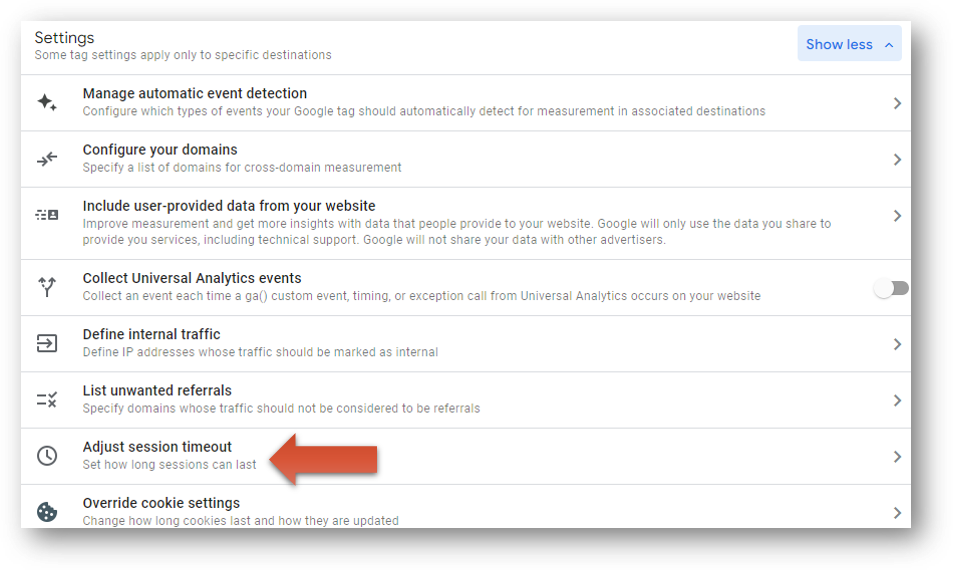
Now, adjust your session timeout using the drop down fields. I’ve set the session timeout for the Root and Branch site to be 7 hours and 55 minutes. This is the longest allowable setting.
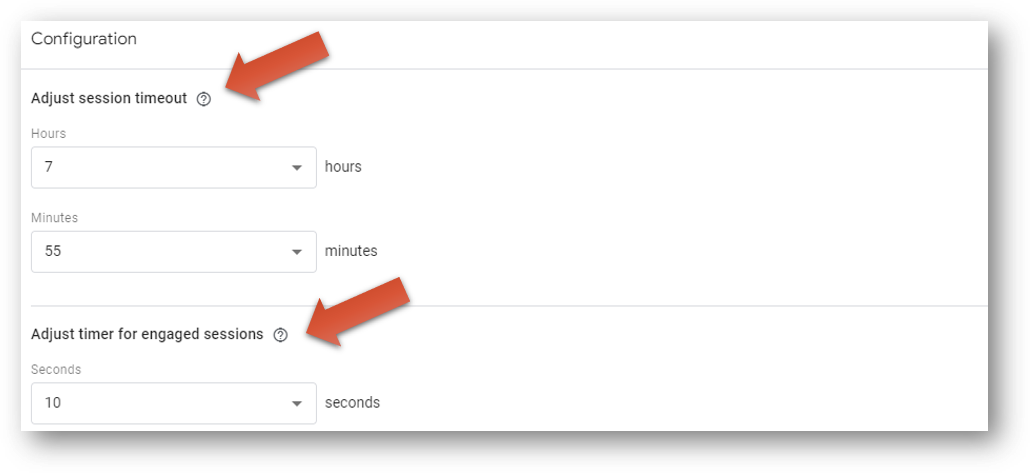
In this same area you can also adjust the timer for something called “engaged sessions” in GA4. An “engaged session” is a new metric in GA4 relative to UA. If you’d like this to be longer, you can increase it up to 60 seconds here. Personally, I have kept mine at 10 seconds but this should be contingent on your measurement plan.
Related note: your engaged session timer will affect your GA4 bounce rate. That’s because bounce rate in GA4 is simply the inverse of the “engaged session rate.” As part of step #3, I’d recommend you read through the explanation linked in the prior sentence if you don’t yet fully understand bounce rate in GA4 compared to UA.
Filter Internal and Developer Traffic (#4)
When you look at your GA4 data, it’s likely you want to see the activity of your customers and prospects and not activity from yourself or your coworkers. And we can exclude that internal traffic from your GA4 data by defining and excluding your internal traffic.
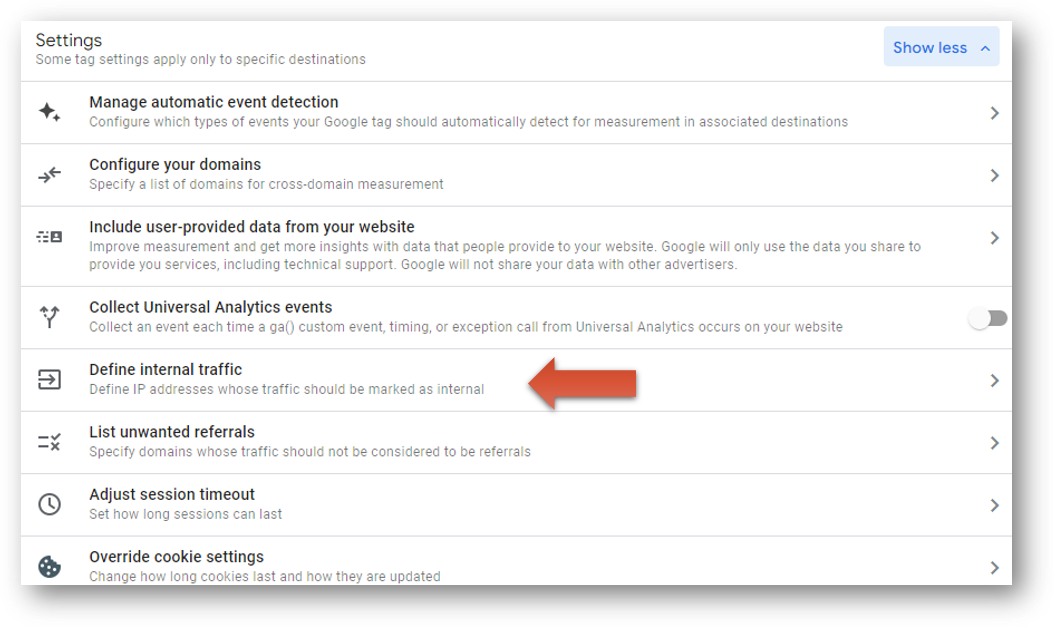
We’ll click back into the same “Configure Tag Settings” that we worked in for step #3, and this time click to “Define internal traffic.”
Hit the blue “Create” button to define your internal traffic. Now configure your filter by giving it a name and an IP address (or range of IP addresses) to filter out. If you don’t know your IP address, you can simply ask Google “what is my IP” and you’ll get your answer. Here’s what the internal traffic filter looks like for my internal traffic.
Once you’re done, hit the blue “Create” button again.

Now you need to make your filter active. Click out of your Data stream settings. You’ll need to click into “Data settings” within the Admin section of your property, and then click on “Data filters.”
Hit the “Create Filter” button and you’ll see the option to create a filter for “Developer Traffic” or for “Internal Traffic”. Choose “Internal Traffic” and scroll down to “Filter state” and set it to “Active” if you’re ready to exclude the internal traffic that you’ve previously defined. In the future you’ll be able to deactivate or activate the filter by clicking on the 3 dot icon as shown below.
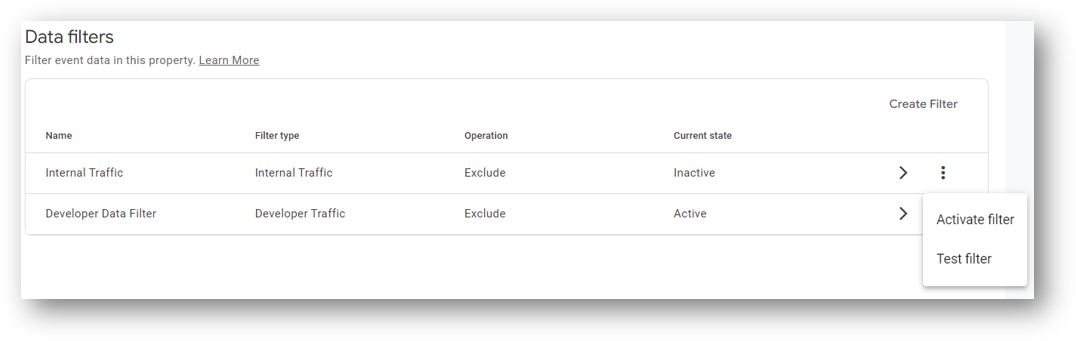
If you’d also like to exclude your developer traffic from your GA4 reports as I have, create a second filter to exclude Developer Traffic. This will exclude all event data that includes debug_mode or debug_event.
Check the 7:15 mark in the video embedded at the top of this page if you want to review the process.
List Unwanted Referrals (#5)
In Universal Analytics we had something called a “referral exclusion list.” This list identified traffic sources that would have been identified as unique traffic sources that started a new session. However, since they were on the “exclusion” list, they would not be classified as new session from a new traffic source. In GA4, this same thing is referred to as your “unwanted referrals.”
One common example for unwanted referrals is Ecommerce sites that use a third party payment gateway to read and transfer payment information from a customer to a merchant’s bank account. Some popular payment gateways include Square, Stripe, and PayPal. Here’s a graphic illustration of the process below for the checkout process on an Ecommerce site using PayPal as a payment gateway.
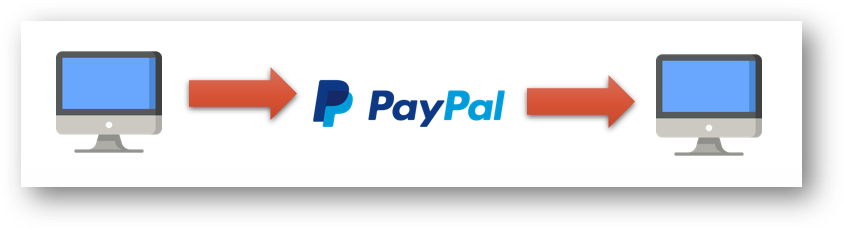
In this example, the site visitor gets temporarily directed from the Ecommerce site to PayPal to complete their purchase. After the transaction is completed with Paypal they get sent back to the Ecommerce site. Should this return visit count as a new session coming from PayPal? If you don’t think so either, you’d want to add PayPal as an unwanted referral.
Go back to your Data Stream settings and then Configure Tag Settings –> Show All. Click into “list unwanted referrals” and then simply list the domains you wouldn’t want to see within your referrals.
Look at the 9:59 mark in the video embedded at the top of this page if you want the video walkthrough of the full process.
Set up Cross Domain Tracking (#6)
Cross domain tracking is one area where GA4 has a big advantage over Universal Analytics. This process could be time consuming and complicated in UA, and it’s very straightforward in GA4.
All you need to do is click into “Configure your domains” within the “Configure Tag Settings” option in your Data stream. Then, simply enter any domains that you want to configure for cross domain tracking.
![]()
![]()
If you’re a bit confused about cross domain and cross subdomain tracking in GA4, the video below will clear everything up.
Review Enhanced Measurement Events (#7)
There are technically 4 categories of GA4 events: automatically collected events, enhanced measurement events, recommended events, and custom events. Check out this link for an overview of all GA4 events, or read on below for more about the first two buckets which are what you need to know about right now.
The first bucket is “automatically collected events”. Your GA4 property begins tracking event data for these events as soon as it is installed. See below for 3 automatically collected events in GA4.
- session_start: This event fires when a user first launches a session with a website (or app).
- first_visit: Was it the first time this particular user has been on the site or the app? If so, the first_visit event will fire.
- user_engagement: Once Google Analytics determines a user is engaged with a page (i.e. not user who lands and then almost immediately bounces away), a user_engagement event will fire
The second type of events are called “enhanced measurement” and it’s another spot where GA4 has a leg up on UA.
Enhanced Measurement in GA4
Tracking event data like scrolls, outbound link clicks, video engagement, and file downloads in Universal Analytics requires the help of Google Tag Manager (GTM). In GA4, these can all be tracked by default.
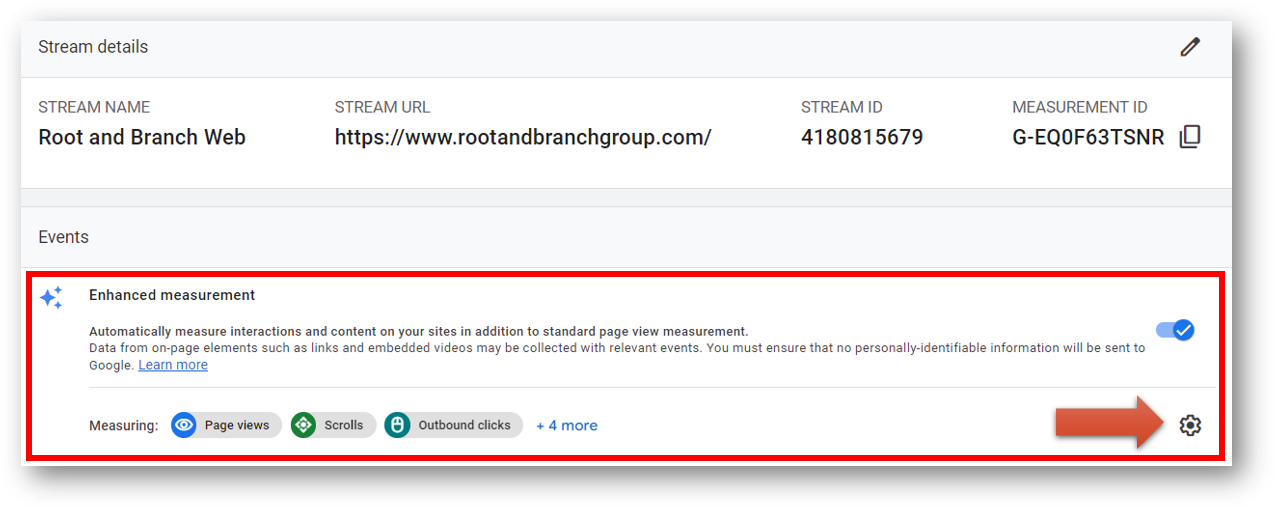
To review your enhanced measurement events, click the gear icon as shown by the red arrow from within your Data Stream settings.
Now, you’ll see a list of enhanced measurement events that you can leave turned on or can toggle off with a single click.
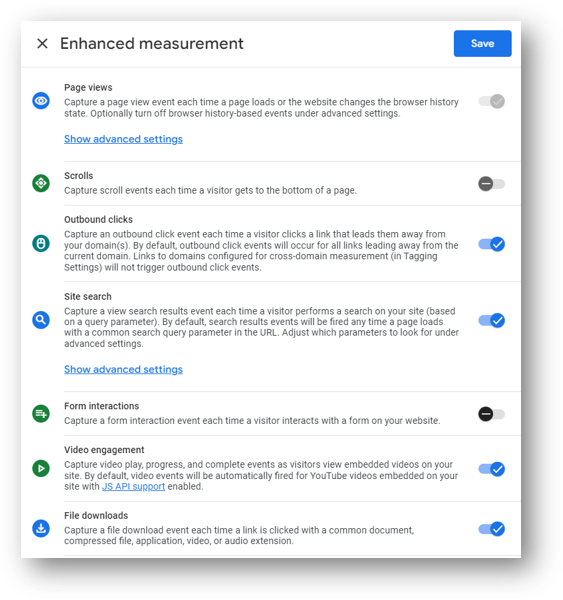
Why might you want to toggle any of them off? Well, it’s possible you might want to set up more robust tracking with a GA4 custom event in certain cases. One example is the “Scrolls” enhanced measurement event that you can see is turned off above. This enhanced measurement event will automatically fire at a scroll depth of 90%. If you want to track scroll depth at say, 25%, 50%, 75%, and 90% this basic enhanced measurement event won’t help you. So if 90% is fine for your purposes, you should leave it turned on. Otherwise, you can follow the tutorial below to set up more comprehensive scroll tracking at custom scroll depths.
Just remember to come back and turn off the enhanced measurement version of this event so you don’t duplicate your data!
Register Select Enhanced Measurement Event Parameters as Custom Dimensions (#8)
In GA4, an “event parameter” is an additional piece of data that adds context to an event. An “event” is simply a tracked web interaction like a click or a scroll or a pageview.
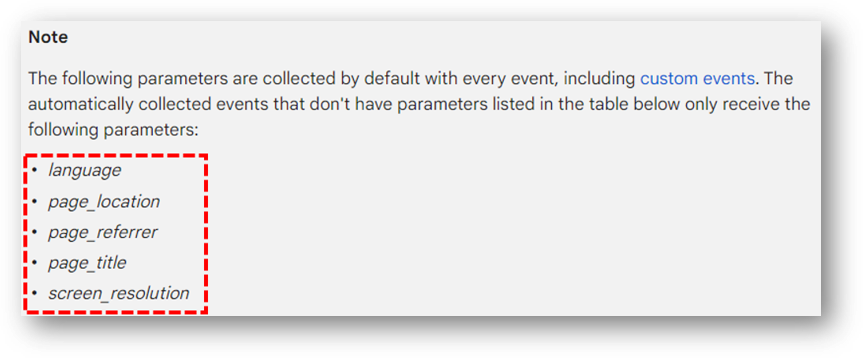
Some of these event parameters are collected automatically with events. There are 5 that fit into this category. You can see them below in the screenshot from the relevant Google help article.
Other event parameters can be created along with GA4 custom events. They may also be collected with some of the enhanced measurement events. An example of the latter is the search_term event parameter that will show the specific term that was searched when the view_search_results enhanced measurement event fires. This is an important parameter because without it you’ll only see that a site search took place – not the useful information about what specifically was searched. But there’s a catch!
If you don’t register this event parameter as something called a “custom dimension” you won’t be able to see it in your GA4 reports.
This is a completely different (and completely incremental) step compared to Universal Analytics. In fact, it’s so different and not intuitive that for the longest time I couldn’t figure out why I wasn’t seeing my event parameter data in GA4. Check out the steps below to registering a custom dimension, or for a thorough review you can read this practical guide to event parameters.
How to Register a Custom Dimension in GA4
- Access the “Configure” menu in the left-hand menu navigation of GA4.
- Select “Custom definitions” within the Configure menu area.
- Hit the blue button at right to “Create custom dimensions”.
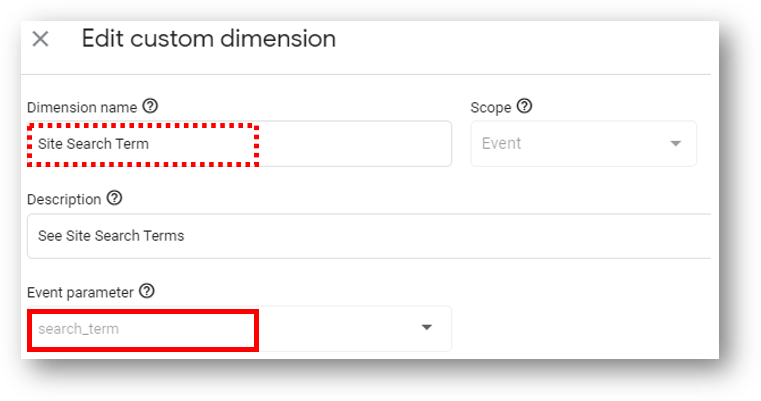
- From here, you will create a new custom dimension with a “dimension name” (red dashed box below) that you want to see in your event reporting. You’ll also need to enter the precise “Event parameter” that you want to see in your reports. This is called search_term for the specific case we referred to above. Save your custom dimension.
For bonus points, you can build an awesome report with Google Data Studio to show your site search activity. Here’s how.
Change Data Retention Settings (#9)
There are multiple ways to access reporting data in Google Analytics 4. In addition to Data Studio (which I highly recommend), you can use standard reports or Explorations within the GA4 interface.
Standard reports are the second item down in the left-hand navigation within GA4. You can see them below, simply called “Reports.” You can customize these reports, but they are generally less robust than the comparable standard reports in Universal Analytics.
That’s where the GA4 Explorations step in to help fill some of the gap. You access this reporting section in the “Explore” menu item shown immediately below “Reports.” With explorations you can build a Path Exploration or a Funnel Analysis, or create any number of custom reports.
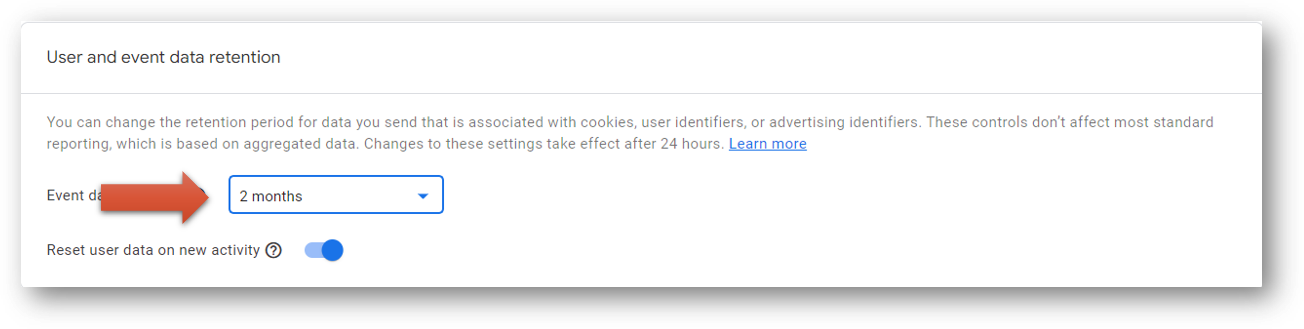
The catch is that you’ll only have 2 months of data to work with if you don’t change your data retention settings. The good news is that this is a simple change to make. From the Admin section of GA4, click into “Data Settings” within the property settings in the middle of the page.
Now click on “Data Retention.” You’ll see the option to change your “Event data retention” from 2 months to 14 months by using the dropdown selector. If you’d like to have more data available, change this to 14 months and then click save.
Review Attribution Settings (#10)
Attribution refers to how credit gets assigned to various traffic channels when a conversion occurs.
Let’s say you are tracking submitted contact forms as a conversion. One of your visitors comes to your site 4 times before submitting the form. She first comes to the site from organic search. She comes back a second time by clicking through a Facebook post. She then comes back a third time through organic search to do more research about your company. Finally, she comes back a fourth time after clicking on a retargeting ad and converts during that fourth session.
How would Google Analytics assign credit for that conversion? Well, with Universal Analytics the default attribution model was something called the “Last Non-direct Click” model. In other words, the last traffic source would get 100% credit for this conversion.
Default Attribution in GA4: “Data Driven”
In GA4, however, the default attribution model is something called the “Cross-channel data-driven model.” With data-driven attribution, Google Analytics is a bit more evenhanded with allocating credit for conversions. Google Analytics will review how visitors engage with your specific website and will assign credit accordingly. With the help of big data and machine learning, data driven attribution would give partial credit to various traffic sources and should be a more accurate measurement. Critically, the presumed boost in accuracy with data driven attribution in GA4 will also come with variance compared to conversion reporting in UA. For people who are trying to change as little as possible in GA4 compared to UA, this might not always be a good thing.
Determine which group your organization falls into, and then change accordingly if you need to. Click into “Attribution Settings” from within the property settings of your Admin section. This is where you can change your attribution model for reporting. As you can see below, there is a drop down menu where you can change from the default if you’d like.

For more about attribution, including the Google Ads attribution model as well as other models like linear attribution and time decay you can check this video.
Beyond The First 10: Reporting, Data Studio and More
Congratulations! Your GA4 property is now set up and properly configured. From here, it may be time to get more familiar with your reporting and start building the reports you’ll need for your business. Prepare yourself for the fact that reporting is fundamentally different in GA4 compared to UA.
GA4 Reports vs. UA Reports
Universal Analytics was essentially built as a comprehensive suite of reports. Want to analyze your top landing pages? There’s a built in Landing Pages report for that. Want to understand what pages users are leaving your site from most frequently? It sounds like the Exit Pages report is where you want to go. The list of highly effective reports goes on and on (including the Site Search report, Site Speed report, Device Overview report, New vs. Returning User report, Affinity Categories report, and more). GA4, on the other hand, seems built more towards collecting data in a more privacy-compliant way. Actually using the data requires us to do a lot more manipulation than our history with UA might lead us to expect.
- Build a Site Search report with Data Studio to see what your visitors are looking for on your site
- How to build a Path Exploration with GA4 data
- GA4 event parameters: Also known as, where did my Category, Action, Label, and Value event parameters go!?
- GA4 custom dimensions: aka why can’t I find my event parameter data?!
- GA4 page timer tracking Also known as, how the heck can I track time on page in GA4?
- Bounce rate in GA4 vs UA: why is it so different in GA4 vs UA?
- The data model in GA4: Hits, events, sessions, and users explained in GA4
- How to set up a GA4 form submission conversion
- How to see UTM tagged campaign data in GA4
- How to create the Source/Medium traffic report in GA4
- Goals in GA4 explained vs UA
Wrapping Up
I hope this helps as you think about your plans for Google Analytics 4. There’s certainly a lot to learn with the platform. There’s typically a new video each week on the Root and Branch YouTube channel so feel free to subscribe here if you want to stay up to date.
About Root & Branch
Root & Branch is a certified Google Partner agency and focuses on paid search (PPC), SEO, Local SEO, and Google Analytics. Learn more here, or hit the button below to check out YouTube for more digital marketing tips and training resources.


")

")


This is a phenomenal guide! I have very minimal prior knowledge of Universal Analytics but you were able to address what I did know about it, and still explain the different approaches very simply.
I was curious about the mentioned “recommended events”. Could you provide a little more info about what these are and why one might want to use them? Thanks again!
I had missed your comment earlier, but hopefully I answered it the second time you dropped by. Thanks for reading and feel free to let me know if I didn’t answer your question.
Hi Zack,
Thank you for your post. Very helpful. I have a little bit of knowledge of UA, but you did a great job of breaking down the differences and making them easy to understand. I was wondering if you could elaborate on the third type of GA4 events: “recommended events” and when these would typically be useful?
Thanks,
Nick
Hi Nick,
Thanks for coming by! Basically, when you get to the 3rd type of events (recommended events and also custom events), you’re in the realm of needing Google Tag Manager for setup. The first two types can be done automatically within only GA4, or with a minor modification in GA4.
The difference between “recommended events” and “custom events” is really that Google has specific naming conventions that they are already recommending for the “recommended events”. The setup process doesn’t really differ.
One example in GA4 would be tracking form submissions. This wouldn’t fall in the category of either an “automatically collected” event or an “enhanced measurement event”. The video below shows the process of setting up that in GA4 with the help of Google Tag Manager. Google recommends that this type of event be named ‘generate_lead’. Thus, it would technically be a recommended event. But as you’ll see in the video if you watch it, I named the event ‘form_submit’ (or something like that). I’m either a bad rule follower or a wild and crazy rebel. So that would make it a “custom event” for me, I suppose!
https://youtu.be/mc9BHAmnrMI
Hi, I’m new to analytics. I installed GA4 manually as per your video, but did not use GTM to connect. It says data will start collecting within 48 hours.
Question: What is the purpose of using GTM to connect, if the manual installation on the site says is collecting without it?
Note: this is an intranet informational website only, we do not collect PII and will not use any monetization/ad features.
Hi Doris,
The biggest benefit for using GTM is that it allows you to create some more advanced event-tracking that isn’t possible without Tag Manager. In GTM you can create “GA4 event tags” that send data to GA4 when targeted website interactions take place. There are some options here that aren’t possible to track without GTM. If you don’t have need for that, you probably don’t need GTM.
Here’s an example of something you’d need GTM to help you track in GA4: https://www.rootandbranchgroup.com/ga4-button-click-tracking/
And here’s a blog about some of the custom events you can track *without* Google Tag Manager. https://www.rootandbranchgroup.com/ga4-custom-events/
It really comes down to what things you’ll want to track on your informational site. You may be absolutely, totally fine without Tag Manager. Good luck!
Super valuable and high-quality content! Thanks a lot for helping in setup my new website. <3
Glad you found it useful! Wish you all the best with the new site.
You’re quite welcome. Glad it was helpful.
Bro!!!!!
You are a saviour
Glad you found it helpful, man. : ) God bless!